This article is about an app I decided to make in order to play with CoreML and SwiftUI.
I wanted to make a reader for RSS feeds, and I though it would be a good idea to include a model to automatically label the entries of the feed. The app, and the playground I used to train the model, can be found on GitHub.
The sample app
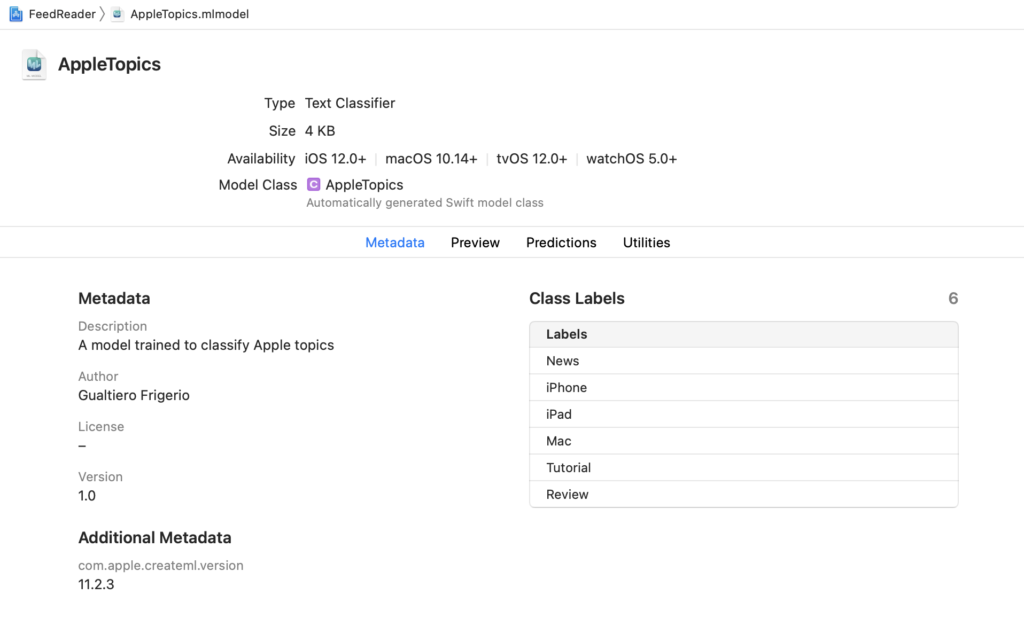
The app reads the RSS feed of Macworld, a popular site about Apple stuff. I trained my model with articles from the feed and chose 6 labels to being with. I have iPhone, iPad, Mac, Tutorial, Review and News.
The app starts reading the feed, then parses the XML into a struct, tries to pick the right category with the help of CoreML and shows the entries. When tapping on each entry, the article is presented on a Safari Controller.
I won’t go into details about the XML parsing and opening a UIKit view inside SwiftUI as this article is about CoreML, but if you’re interested in XML parsing I made the class available as a single file in my utilities repo so you can easily copy&paste into your project.
Create the model
The model I trained isn’t perfect, I didn’t bother collecting too much data to train it but I think it is ok for a sample project and to start playing with CoreML.
I’m going to show you two different ways to train a model, the first with a Swift Playground and the second in Python, with Turi Create.
The two models can be used in two different ways in our app, the first created with Swift will be used as a NLModel, the second as a MLModel.
First let’s look at the training data. I made it available on GitHub so you can take a look. For a text classifier, the training data can be provided with a CSV file or with a JSON. In my example I used a JSON for the training and test data and the format is quite simple
[
{
    "text" : "iPhone 13 will go on sale 'end of September 2021'",
    "label" : "iPhone"
},
{
    "text" : "Best free iPad games 2021",
    "label" : "iPad"
}
]
text represents the text we want to categorise and label is the output we expect.
Let’s start with the Swift playground, I included it into the repo here
import CreateML
import Foundation

let fileURL = URL(fileURLWithPath:"/tmp/traindata.json")
let testURL = URL(fileURLWithPath: "/tmp/testdata.json")

if let data = try? MLDataTable(contentsOf: fileURL),
   let textClassifier = try? MLTextClassifier(trainingData: data,
                                   textColumn: "text",
                                   labelColumn: "label") {
    // create test data
    if let testData = try? MLDataTable(contentsOf: testURL) {
        let metrics = textClassifier.evaluation(on: testData,
                                                textColumn: "text",
                                                labelColumn: "label")
        print("metrics \(metrics)")

        let metadata = MLModelMetadata(author: "Gualtiero Frigerio",
                                       shortDescription: "A model trained to classify Apple topics", version: "1.0")
        let modelFileURL = URL(fileURLWithPath: "/tmp/AppleTopics.mlmodel")
        try textClassifier.write(to: modelFileURL, metadata: metadata)
    }
}
this is all it takes to train the model, evaluate it with test data and export it as a .mlmodel that can be imported in Xcode.
First we need to load the JSON with the MLDataTable. You can think of this struct as a spreadsheet with columns representing a feature and rows containing the records. This is why we have a textColum and labelColumn parameter, although with a JSON we don’t actually have columns like in a spreadsheet.
From a data table we create a MLTextClassifier specifying which field of the JSON is the text and which is the label. Then we can evaluate the classifier with the test data, again we use MLDataTable and then we specify the fields for text and label.
Finally we can save the model with some metadata and this file can be imported in Xcode.
What if we want to use Python?
We can create the model with the same JSONs we used in Swift.
import turicreate as tc

training_data = tc.SFrame.read_json('training.json')
test_data = tc.SFrame.read_json('testdata.json')

model = tc.text_classifier.create(training_data, 'label', features=['text'], max_iterations=100)

predictions = model.predict(test_data)

metrics = model.evaluate(test_data)
print(metrics['accuracy'])

# Save the model for later use in Turi Create
model.save('MyTextMessageClassifier.model')

# Export for use in Core ML
model.export_coreml('AppleTopicsTC.mlmodel')
This is quite similar to what we did in Swift in the example above.
At the end with export_coreml we export the model in the format compatible with Xcode.
The models aren’t actually the same, and I’ll show you how to use them in two different ways.
Use the model
Now that we have the .mlmodel file it is time to import it in Xcode by simply dragging the file as you’d do for an asset.
Xcode will recognise the format and automatically create a Swift class to deal with the model.
If you want to take a look at the generated class click on Automatically generated Swift model class and it will take you there. You’re not supposed to edit the class, but you can take a look to understand what’s going on under the hood.
Since there is this generated file, you can interact with the model by instantiating that very class, so you don’t refer to the model by loading the .mlmodel file but you can create a new object.
As I mentioned before, I made two models and you can use them in two different ways. Let’s start with the NLModel. Both examples are in the FeedTopicHelper class that can be found here.
private lazy var topicClassifier: NLModel? = {
    if let topicClassifier = try? AppleTopics(configuration: MLModelConfiguration()).model,
       let model = try? NLModel(mlModel: topicClassifier) {
        return model
    }
    return nil
}()

func getTopic(forText text:String) -> String? {
    topicClassifier?.predictedLabel(for: text)
}
As you can see, we create topicClassifier by instantiating AppleTopics, the automatically generated class. We then try to create a NLModel from this MLModel, and this is the natural language processing model we’ll use to categorise our feed topics.
The use is quite simple, we call predictedLabel(for:) passing the topic’s title and we get one of the labels trained by the model.
What about the other model?
That model can’t be used as a NLModel, so we’ll use it as a generic MLModel and try predicting the label in a similar way.
let words = wordsFromText(text: text)
if let model = try? AppleTopicsTC(configuration: MLModelConfiguration()),
   let prediction = try? model.prediction(text:words) {
    topic = prediction.label
}
The model needs as an input a dictionary of String:Double, so we first need to transform the original text in a dictionary with each word and a Double value. I follow this guide to make the wordsFromText function.
This time we get back a prediction and we can see the label, or a dictionary with every possible label and the associated weight, so how likely this label the correct one. prediction.label returns the one with the higher value which should be the correct prediction.
Conclusion
This was just a quick introduction to CoreML, I thought this example was simple enough to be covered in a blog post yet useful for an app.
One of my original ideas for this app was the ability to train the model on device, by giving the user the ability to change the category and train the model with his input, but I haven’t yet found a way to make this model updatable. If I do find a way, I’ll update this posts with all the code, as usual.
Happy coding 🙂