I’ve written about CoreML and Vision in the past and this time I decided to use both of them to perform object recognition in images in a simple iOS app.
You can find the post about Vision at this link, in the example I used Vision to perform barcode detection and OCR. My first post about CoreML can be found here and it was about text classification.
The sample project
As usual, all the sample code in this post can be found on GitHub.
The app allows you to perform recognition on an image picked from the photo library, or open the camera and perform a live recognition. When an object is recognised a layer is added on top of the image (or feed).
The app is an hybrid of SwiftUI and UIKit, nowadays I always start a new project with SwiftUI and add UIKit components when necessary. In this example, I need UIKit for picking an image from the library or show the live camera feed.
Most of the code responsible for setting up AVFoundation is similar to the example for OCR and barcodes, so I won’t go into details about that.
The model
In my post about text classification I trained my own model, but this time I preferred to use an existing one, as I only want to show you how to perform image recognition, I’m not interested in a particular category of objects so I don’t need a specific model.
There are many ML models capable of recognising objects, I chose one of the model listed in Apple’s website https://developer.apple.com/machine-learning/models/ in particular I went for the YOLOv3-Tiny. I didn’t include it in my GitHub project, so you have to download and add it in Xcode.
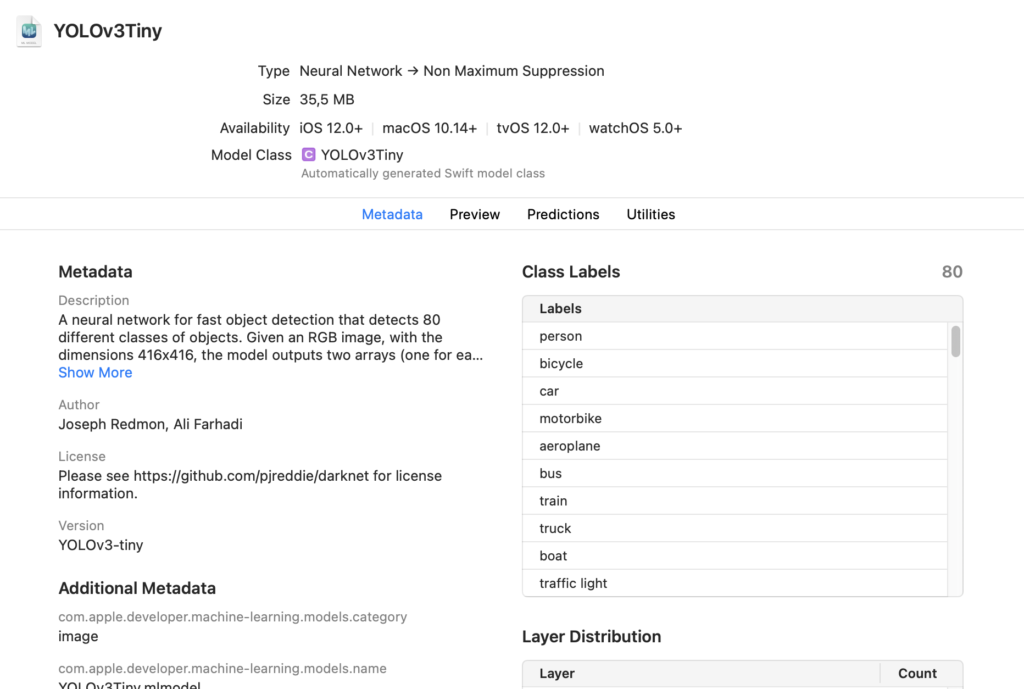
this is the model in Xcode. If you click automatically generated Swift model class you can se a YOLOv3TinyInput class. You don’t have to touch the generated class, but you can instantiate it from your code. In this particular example, we don’t need to access the class directly as we did for text classification though.
The recognition is performed in my class ObjectRecognizer
private func loadModel() {
    guard let modelURL = Bundle.main.url(forResource: "YOLOv3Tiny", withExtension: "mlmodelc") else { return }
    do {
        let visionModel = try VNCoreMLModel(for: MLModel(contentsOf: modelURL))
        let objectRecognition = VNCoreMLRequest(model: visionModel, completionHandler: { (request, error) in
            if let results = request.results {
                self.processResults(results)
            }
            else {
                print("no results error \(String(describing: error?.localizedDescription))")
            }
        })
        objectRecognition.imageCropAndScaleOption = .scaleFit
        self.requests = [objectRecognition]
    }
    catch let error as NSError {
        print("Error while loading model: \(error)")
    }
}
This is the code for loading the model and set up the completion handler.
First we need to load the model file. In Xcode you import a mlmodel file, but when you need to load it at runtime be sure to use the mlmodelc extension because a compiled version of the model is bundled within the app, not the original file.
Next we instantiate the model and create a VNCoreMLRequest. This request uses CoreML (the VNCoreMLModel we just instantiated) to process images and return results. The completion handler we specified will contain the results of the object classification on the image we’ll provide later.
We then save the VNCoreMLRequest in an instance variable, so we can use this request every time we need to perform classification on a new image.
func recognize(fromImage image:UIImage,
               completion:@escaping([RecognizedObject]) ->Void ) {
    guard let cgImage = image.cgImage else {
        completion([])
        return
    }
    self.completion = completion
    let imageRequestHandler = VNImageRequestHandler(cgImage: cgImage, options: [:])
    do {
        try imageRequestHandler.perform(self.requests)
    }
    catch {
        print(error)
    }
}
The code above performs the recognition of a single image. We need a CGImage and that’s straightforward when given a UIImage, then we have to instantiate a VNImageRequestHandler with the image, and perform the request we saved before. That’s why we saved the VNCoreMLRequest, so we don’t need to create a new one each time we want to recognise a single image.
Remember we set the completion handler in the set up function, and it calls processResults so let’s take a look at the function
private func processResults(_ results:[Any]) {
    var recognizedObjects:[RecognizedObject] = []
    for result in results {
        guard let vnResult = result as? VNRecognizedObjectObservation,
              let label = vnResult.labels.first else {
            continue
        }
        print("detected \(label.identifier) confidence \(label.confidence)")
        if label.confidence > confidenceThreshold {
            recognizedObjects.append(RecognizedObject(bounds: vnResult.boundingBox, label: label.identifier, confidence: label.confidence))
        }
    }
    completion?(recognizedObjects)
}
First we need to cast the result as a VNRecognizedObjectObservation. This object contains an array of labels, each of them is an object recognised by the model.
I created a convenience struct RecognizedObject to pass those value around and we’re interested in 3 properties: the confidence, so we can discard results with a lower value that may be wrong predictions, then the boundingBox representing the rectangle where the model recognised a particular object. Finally, we have the identifier, such as “car”, “cup”, “keyboard” etc.
Draw objects
After we recognised an object, at least for debugging purposes, it would be nice to show the bounding rectangle of the object and its identifier.
I wrote some utility functions you can find in this class so feel free to copy them in your project if you need to achieve something similar.
static func createLayer(forRecognizedObjects objects:[RecognizedObject],
                        inFrame frame:CGRect) -> CALayer {
    let objectsLayer = CALayer()
    objectsLayer.frame = frame

    let color = CGColor(red: 1.0, green: 1.0, blue: 0.0, alpha: 0.4)

    for object in objects {
        let rect = GeometryUtils.boundingBox(forRecognizedRect: object.bounds,
                                             imageFrame: frame)

        let layer = GeometryUtils.createRectLayerWithBounds(rect, color: color)

        let textLayer = GeometryUtils.createTextLayerWithBounds(layer.bounds,
                                                                text: object.label)
        layer.addSublayer(textLayer)
        objectsLayer.addSublayer(layer)
    }

    return objectsLayer
}
This is the function I call every time an object has been recognised. The inFrame parameter is necessary so we can adjust the boundingBox to the view displaying the image (or the live feed). The boundingBox returned by Vision has to be transformed, because its values are within 0 and 1. You can see how I do it in the function boundingBox
static func boundingBox(forRecognizedRect: CGRect, imageFrame: CGRect) -> CGRect {
    var rect = forRecognizedRect

    rect.origin.x *= imageFrame.width
    rect.origin.y *= imageFrame.height
    rect.size.width *= imageFrame.width
    rect.size.height *= imageFrame.height

    // necessary as the recognized image is flipped vertically
    rect.origin.y = imageFrame.height - rect.origin.y - rect.size.height

    return rect
}
I found out that is necessary to flip the image vertically, because the coordinate space is different.
Creating a CALayer with a rectangle is quite easy
static func createRectLayerWithBounds(_ bounds: CGRect, color:CGColor) -> CALayer {
    let shapeLayer = CALayer()
    shapeLayer.bounds = bounds
    shapeLayer.position = CGPoint(x: bounds.midX, y: bounds.midY)
    shapeLayer.backgroundColor = color
    shapeLayer.cornerRadius = 7
    return shapeLayer
}
We create a layer with the correct size, set its position in the middle of the rectangle and set a background color. In order to show what is under the layer make sure to provide a CGColor with some transparency.
To write the identifier, we can use a CATextLayer that allows us to create a CALayer with a string. It is even possible to specify a UIFont and you can print a NSAttributeString so it is very powerful.
static func createTextLayerWithBounds(_ bounds: CGRect, text: String) -> CATextLayer {
    let textLayer = CATextLayer()
    let formattedString = NSMutableAttributedString(string: text)
    let largeFont = UIFont(name: "Helvetica", size: 18.0)!
    formattedString.addAttributes([NSAttributedString.Key.font: largeFont], range: NSRange(location: 0, length: text.count))
    textLayer.string = formattedString
    textLayer.bounds = CGRect(x: 0, y: 0, width: bounds.size.height - 10, height: bounds.size.width - 10)
    textLayer.position = CGPoint(x: bounds.midX, y: bounds.midY)
    textLayer.shadowOpacity = 0.7
    textLayer.shadowOffset = CGSize(width: 2, height: 2)
    textLayer.foregroundColor = CGColor(colorSpace: CGColorSpaceCreateDeviceRGB(), components: [0.0, 0.0, 0.0, 1.0])
    textLayer.contentsScale = 2.0 // 2.0 for retina display
    return textLayer
}
And that’s it. You can add this layer to the UIImageView showing the image, or add it to the preview layer of a camera feed.
Conclusion
It was a bit tricky to print the rectangles on the UIImageView but I have to say I had fun with this project. CoreML is at the same time powerful and simple to use and I definitely plan to experiment (and of course write) more about this subject.
Happy coding 🙂