I don’t think I need to write about the importance of testing. We all know it is critical to add some testing to the code, so we refactor code, add new functionalities, fix bugs and check that the existing stuff didn’t break.
Maybe writing tests isn’t the most exciting part of the job, but it is necessary and can save time in the long run, as you can improve you code while writing tests (especially when you are using TDD) and it can catches regressions automatically.
My first experience with testing goes back to the beginning of my career, when I wrote the an embedded app to send and receive faxes. I had several components, the main ones were responsible for the communication with the modem and the image conversion. While I was testing the image conversion I didn’t need to receive or send an actual fax every time, all I needed was an input image and an output, and expected my test to pass if I could have the same output given a set of input images. That was a unit test and is the topic of this article. Another kind of test I encountered in my career was the stress test and I used it to test hardware capabilities. In those tests the CPU temperature wasn’t suppose to get too high, the fans had to start spinning at a given point, etc. Again, maybe it wasn’t the best job in the world, but was really important for hardware development. If you’re still reading I assume you care about testing so I can just quit annoying you and get back to the title: testing in Xcode
Adding tests
I didn’t feel like creating another project for the purpose of testing, so I picked one of my existing ones on GitHub, the image viewer I’ve talked about in a previous article https://www.gfrigerio.com/2019/02/04/building-an-image-gallery-app/
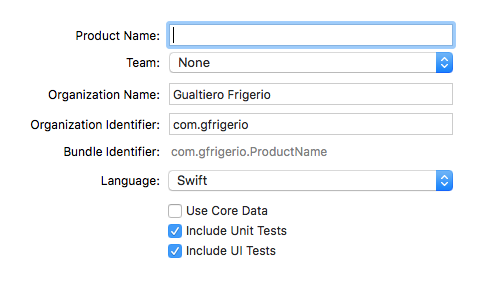
When I created the project I checked Include Unit Tests and Include UI Tests as you can see in the picture
If you want to add tests to an existing project you can go to File -> New -> Target and chose UI testing bundle, then you have to add a scheme by going to Product -> Scheme -> Edit Scheme.
When you want to run tests you can do it by clicking on Product -> Test, just below the Run command you’re familiar with.
Unit tests
Let’s start with Unit tests not involving the UI. Those are great to test some classes of your project like data sources, when you don’t care about how data is presented and the user interaction but just want to make sure the model is working.
I wrote a couple of unit test functions, you can find them here: https://github.com/gualtierofrigerio/FolderImageViewer/blob/master/FolderImageViewerTests/FolderImageViewerTests.swift
First of all: test functions begin with the word test. You’re free to include some helper functions as I did in the UI testing file and they won’t be called automatically by Xcode, while functions beginning with test will be executed.
Xcode will create a subclass of XCTestCase for you with a setUp and tearDown function. The setUp, guess what, is called while the test is starting so you can create whatever you need for your tests once.
In my example I have a variable called basePath and I set it in setUp to match the test directory in the app’s bundle. I then create a DataSource instance and set its base path.
Now let’s take a look at the tests I made. The first one checks if the DataSource returns all the subfolder of the root.
let subfolders = dataSource.getSubFolders(ofFolder: "")
XCTAssertEqual(subfolders, ["folderA", "folderB"])
XCTAssertEquals expects the two expressions to be equal, in case they’re not the test fails. There are other similar functions like XCTAssertTrue, or XCTAssertNotEqual, XCTAssertNil etc.
The next tests checks if the content of a folder is not nil, and that the file names are correct. I could have written some more unit tests, but I think those two are ok for the sake of this article. I want to point out a difference between Unit tests and UI tests: the first is meant to test the classes and their functions, so you can be sure your APIs are functioning as expected, while UI tests is aimed and testing presentation and user interaction.
UI tests
You can find the UI test class here: https://github.com/gualtierofrigerio/FolderImageViewer/blob/master/FolderImageViewerUITests/FolderImageViewerUITests.swift
Just like Unit tests, Xcode creates a subclass of XCTestCase. As I said, test functions have a test prefix, but you can create utility methods and I put them on an extension to have a clear separation.
For UI tests we have an XUIApplication object representing our apps at runtime, I added an app variable and instantiate it during setup, so we can always refer to the running application via this variable.
Let’s start with the very first UI test, we want to tap on the Start browsing button and check if the first UITableView linked to the root folder is on screen. I put the login in startBrowsing and call this function for all UI tests.
func startBrowsing() {
    app.launch()
    let button = app.buttons["Start browsing"]
    button.tap()

    XCTAssertTrue(isShowingFoldersModal())
}
First I launch the app, then I get the only button on screen by its name, and simulate a tap.
While running the test you’ll see a simulator opening, and the button will eventually get a tap, showing our first view controller as a modal.
I want to test the modal is there, and I use one of my utility functions isShowingFoldersModal()
func isShowingFoldersModal() -> Bool {
    return app.tables["Root folder"].exists
}
How can I get the correct table view? I’m using an identifier, the accessibilityIdentifier to be precise. You can set it in interface builder, or in code. As I can instantiate multiple table view controllers in the app I thought it was necessary to set the identifier at runtime, while creating the view controller.
private func createFoldersTableViewController(withFolderName folderName:String, title:String) -> FoldersTableViewController {
    let storyboard = UIStoryboard(name:"Main", bundle:nil)
    let newVC = storyboard.instantiateViewController(withIdentifier: "FoldersTableViewController") as! FoldersTableViewController
    newVC.setDataSource(dataSource, currentFolder: folderName, title: title)
    newVC.imageProvider = imageProvider
    newVC.delegate = self
    newVC.tableView.accessibilityIdentifier = title
    return newVC
}
Once I create the new view controller from the storyboard I can set its accessibilityIdentifier with the title, which is the name of the folder I’m showing.
When creating the first FoldersTableViewController I set its title to be Root folder, hence I can use this name on my tests to see if that particular view controller exists.
The next test checks if the folder named “folderA” exists and the cell with the same name is added to the table view.
func testFolderA() {
    startBrowsing()

    let cellA = getFolderACell()
    let cellAText = cellA.staticTexts.element(boundBy: 0).label

    XCTAssertEqual(cellAText, "folderA")
}


func getFolderACell() -> XCUIElement {
    let table = app.tables["Root folder"]
    let cellA = table.cells.element(boundBy: 0)
    return cellA
}
In this case I get the first cell of a table view, first by getting the table view with its accessibilityIdentifier, then by accessing its cells via the cell property, getting element with index 0. I then check the first label of the cell and the test fails if the text is different than “folderA”.
To demonstrate other ways to access an element in UI testing I created a third test function to check if our scroll view is working fine.
func testFolderAContent() {
    startBrowsing()

    let cellA = getFolderACell()
    cellA.tap()

    XCTAssertTrue(isShowingFolderA())

    let firstImageCell = getFirstImageFolderA()
    firstImageCell.tap()

    XCTAssertTrue(isShowingImages())

    let subviews = getScrollViewContent()
    XCTAssertEqual(subviews.count, 2)
}

func getScrollViewContent() -> [XCUIElement] {
    let imageScrollVC = app.otherElements["imageScrollViewController"]
    let scrollView = imageScrollVC.children(matching: .scrollView)
    let internalView = scrollView.otherElements["scrollViewContainer"]
    XCTAssertTrue(internalView.exists)
    let images = internalView.children(matching: .any)
    return images.allElementsBoundByAccessibilityElement
}
This time I get the first cell and tap on it, so the image scroll view controller will be presented. After check if the view controller is there I get the UIScrollView content and check if we’re displaying the correct number of images.
Let’s dive into getScrollViewContent to find out how I can access the subviews. First I get the view controller via its accessibilityIdentifier I set in code. Then I get the scrollView, you can see I’m using the children property and the matching type, as I know I’m looking for a UIScrollView. I’m not going into details about the project (please refer to the article I linked before) but the scroll view has a single subview, containing all the images. That’s why I need to get the first view, via its identifier, then get all the subviews by matching the type .any. I could have searched for .image, as those are UIImageViews, I went for .any as I could have another container view in the future (maybe with a UIImageView and a UILabel) and I would be able to reuse the same test.
The result is 2, but the folder contains 2 images? Why? Because I only load an image on the left and one on the right of the active one, I selected the first image so there is nothing on the left, thus we expect to have only 2 subviews.
Next steps
This was a quick introduction to Unit and UI testing in Xcode.
I covered only some basic interactions, like tapping on a button or a cell, but you can simulate swipe gestures as well. I may cover that in a future revision of the article, for example to see what happens in my image scroller once you swipe left. For know, happy coding AND testing 🙂