After a few projects made for fun, and for learning, I decided to publish something useful as a CocoaPod: a barcode and QR code scanner. I worked on a similar feature for an app available in the App Store in Objective-C, and decided to rewrite it in Swift to make it available on GitHub. https://github.com/gualtierofrigerio/GFBarcodeScanner
What does this Pod do? Display a view controller either fullscreen or contained within a view to read barcode, QR codes and take a screenshot returning a UIImage of what the user is seeing on the phone. Most apps dealing with barcode and QR codes don’t offer the possibility to also take a screenshot, but I found it really useful as you may want to use some server side API like Google Vision. Imagine you have to deal to a non standard barcode, or the bars are too hard to read but the corresponding number is written below them, you could try to read the number from the image if AVFoundation is not able to.
Intro
I made a simple app to test the CocoaPod, which is basically a view controller you can either show modally or add as a child view controller. I provided the first option, with a close button, just for a quick use of the barcode scanner but I expect people to use it inside a custom view. In this case the view resize itself to fill its superview, and responds to rotation events. Whenever a barcode or QR code is recognised a callback is fired with a string. I haven’t added the option to mark the recognised area like some app do, it could come in a future version. I’m not a fan of coloured rectangles drawn on the screen, they can help but I don’t like seeing them and unless you’re scanning a particular barcode among dozens of other I don’t think you need that feature. As I said I think is more useful to take a screenshot, either to recognise the barcode via Google Vision or similar services or, for example, to report a wrong barcode, or share it.
How to use the pod
I’ll describe the implementation in details, but maybe if you opened this article is just because you want to use my CocoaPod and you’re not really interested in how I wrote it, or you want to try it out and then eventually you’re satisfy your curiosity.
I suppose you know how to add a CocoaPod to a project, if not I’d suggest you go to CocoaPods first. The line to add to the Podfile is
pod ‘GFBarcodeScanner’
Fullscreen
Let’s start with the simplest possible use of the view controller: present it as a modal so it goes fullscreen with a close button. That’s all the code you have to write (it is in ViewController.swift in the Example)
let barcodeVC = GFBarcodeScannerViewController()
barcodeVC.modalPresentationStyle = .currentContext
let options = GFBarcodeScannerOptions(fullScreen:true)
self.present(barcodeVC, animated: true) {
    barcodeVC.startScanning(options:options, completion: { (codes, error) in
        if codes.count > 0 {
            DispatchQueue.main.async {
                self.resultLabel.text = codes[0]
                barcodeVC.stopScanning()
                barcodeVC.dismiss(animated: true, completion: nil)
            }
        }
        else if let err = error {
            print(err)
        }
    })
}
You create the options struct with the parameter fullScreen true, so the default close button is created, then you present the view controller and the completion handler is called every time one or more barcodes are recognised. In my example I take the first code and close the modal, but you can keep it opened and it will continue to scan for barcodes until you call stopScanning().
While it is possibile to customise the UI in fullscreen by changing variables in the GFBarcodeScannerOptions struct, like changing the text, its color, the toolbar’s height and background I think the best way to add the scanner is provide your own UI.
Add as child view controller
I provided an example for adding the scanner as a child view controller in the example project on GitHub. In this chapter I’m going to talk about the ScanViewController class you can find here https://github.com/gualtierofrigerio/GFBarcodeScanner/blob/master/Example/GFBarcodeScanner/ScanViewController.swift
Here’s a screenshot from the example project’s Storyboard
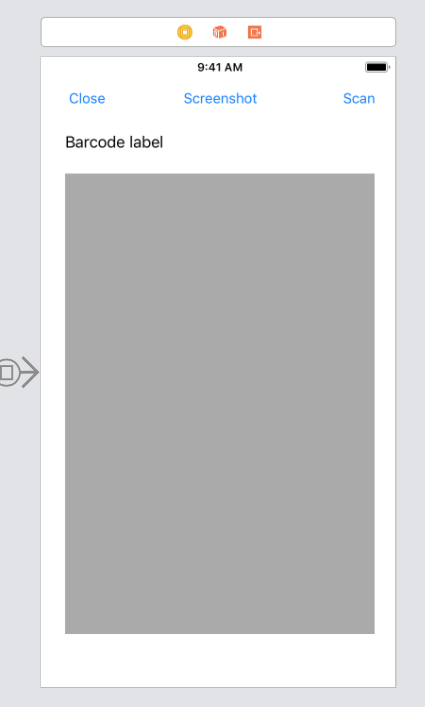
the grey area is the view where the barcode scanner will be inserted. I set it to have flexible width and height so if you rotate the phone you’ll have the bottom part of the view dedicated to the scanner, as it will resize itself to fit into its superview. The Scan button will change its text to Stop while scanning, so you’ll be able to start and stop scanning and pressing Screenshot will get the image, add it into the grey view and stop the scanner.
Let’s have a look at what happens when you tap on the Scan/Stop button
if isScanning {
    removeBarcodeVC()
    scanButton.setTitle("Scan", for: .normal)
    isScanning = false
}
else {
    barcodeVC = GFBarcodeScannerViewController()
    self.addChildViewController(barcodeVC!)
    scanView.addSubview(barcodeVC!.view)
    barcodeVC!.didMove(toParentViewController: self)
    barcodeVC!.startScanning(options:nil, completion: { (codes, error) in
        if codes.count > 0 {
            DispatchQueue.main.async {
                self.resultLabel.text = codes[0]
            }
        }
        else if let err = error {
            print(err)
        }
    })
    scanButton.setTitle("Stop", for: .normal)
    isScanning = true
}

// this is the function to remove the child view controller

func removeBarcodeVC() {
    guard let barcodeVC = barcodeVC else {return}
    barcodeVC.stopScanning()
    barcodeVC.willMove(toParentViewController: nil)
    barcodeVC.removeFromParentViewController()
    barcodeVC.view.removeFromSuperview()
}
Stopping the scanner is quite easy, you call the stopScanning function then remove the view controller from childViewControllers and its view from the view hierarchy.
To add the scanner first you have to instantiate the GFBarcodeViewController, you can skip options as you don’t need a toolbar and a close button, and you have the same completion we saw before with an array of strings representing the recognised codes.
Want to take the screenshot? Here’s the code
@IBAction func screenshotButtonTap(_ sender:Any) {
    guard let barcodeVC = barcodeVC else {return}
    barcodeVC.getImage(callback: { [unowned self](image) in
        DispatchQueue.main.async {
            self.removeBarcodeVC()
            guard let image = image else {return}
            var frame = self.scanView!.frame
            frame.origin = CGPoint(x:0, y:0)
            let imageView = UIImageView(frame: frame)
            imageView.image = image
            imageView.contentMode = UIViewContentMode.scaleAspectFit
            self.scanView.addSubview(imageView)
        }
    })
}
you call getImage on the barcode view controller and that’s it. The rest of the code, executed on the main thread as we’re dealing with the UI, stops the scanner and add a UIImageView displaying the screenshot.
If you need to call an API you may want to convert the image to a base64 string. I didn’t implement it in the example but it is very straightforward so I’ll just past a couple of lines of Swift in case you need to convert the image
let imageData = UIImagePNGRepresentation(image!)! as NSData
let base64 = imageData.base64EncodedData(options: .lineLength64Characters)
That’s it. Next chapter is dedicated to describing the scanner, I hope you’ll have time to read even if you don’t need it for start scanning barcodes in your app.
The barcode scanner
I chose to create two classes: the view controller, responsible for dealing with the UI and exposing function to the user and the GFBarcodeScanner class to interact with AVFoundation.
Let’s start with the view controller https://github.com/gualtierofrigerio/GFBarcodeScanner/blob/master/GFBarcodeScanner/Classes/GFBarcodeScannerViewController.swift
As I usually do I created multiple extensions of GFBarcodeScannerViewController, putting all the private methods in one and having a specific extension for handling the delegate methods. As you can see in the comments I had to make the view controller as the delegate for AVFoundation, as I wasn’t able to get the methods called by setting GFBarcodeScanner as the delegate. In my Objective-C implementation I didn’t need that, and I’m still investigating why. It isn’t a big deal, but my view controller has to know something about AVFoundation and that’s not what I wanted.
The view controller has functions for start and stop the scanner and to take a screenshot as you saw in the examples, and it adapts to the containing view when not in fullscreen mode. Here’s how
public override func viewWillLayoutSubviews() {
    self.cameraView?.frame = getCameraViewFrame()
    self.scanner?.resizeCameraView()
}

private func getCameraViewFrame() -> CGRect {
    var frame = self.view.frame
    if isFullScreen == false {
        if let superView = self.view.superview {
            frame.origin = CGPoint(x: 0, y: 0)
            frame.size = superView.frame.size
        }
    }
    else if let opt = self.options {
        frame.origin.y = opt.toolbarHeight
        frame.size.height = frame.size.height - opt.toolbarHeight
    }
    return frame
}
So either we set the size to equal the superview or we adjust the view so it fills the space below the toolbar when presented fullscreen.
I’ll show the code for resizing the actual camera frame later, but we need to make the call here as the rotation event is received by the view controller.
The view configuration is just boilerplate, and the methods exposed to start/stop and take the screenshot basically call something in GFBarcodeScanner so let’s take a look at it.
You can find the code for GFBarcodeScanner here https://github.com/gualtierofrigerio/GFBarcodeScanner/blob/master/GFBarcodeScanner/Classes/GFBarcodeScanner.swift
I put the configuration struct here, as well as a protocol declaration that merges AVCaptureMetadataOutputObjectsDelegate, that we need to implement to get barcode results, and AVCaptureVideoDataOutputSampleBufferDelegate we can use for screenshots.
As I mentioned before I had to implement the delegate functions in the view controller and not in this class as I wanted to, but I set the delegate in this class as I create the AVFoundation objects there.
So how do we scan for barcodes? That’s what all the project is about and I think it is time to answer that question.
AVFoundation does pretty much all the work for us via the AVCaptureMetadataOutput class, but we still have to do some set up before AVFoundation does the magic.
I’ll start describing the core component, AVCaptureSession, that will enable us to get the barcodes and the screenshot, and to show a live preview of what the camera sees.
private func configureCaptureSession() -> AVCaptureSession? {
    let session = AVCaptureSession()

    let deviceDiscoverySession = AVCaptureDevice.DiscoverySession(deviceTypes:[.builtInWideAngleCamera, .builtInTelephotoCamera],
                                                                  mediaType: AVMediaType.video,
                                                                  position: .unspecified)

    guard let captureDevice = deviceDiscoverySession.devices.first,
        let videoDeviceInput = try? AVCaptureDeviceInput(device: captureDevice),
        session.canAddInput(videoDeviceInput)
        else { return nil }
    session.addInput(videoDeviceInput)

    let metadataOutput = AVCaptureMetadataOutput()
    session.addOutput(metadataOutput)
    if let delegate = self.delegate {
        metadataOutput.setMetadataObjectsDelegate(delegate, queue: queue)

        let videoOutput = AVCaptureVideoDataOutput()
        videoOutput.setSampleBufferDelegate(delegate, queue: queue)

        session.addOutput(videoOutput)
    }
    metadataOutput.metadataObjectTypes = objectTypes

    return session
}
First we need to create a discovery session, so we can get a device to start capturing from. We want a camera and we specify the rear cameras, as we’re not supposed to read a barcode while taking a selfie 🙂 then we set video as we want a device capable of recording video.
We use the first device discovered, it will be the wide angle camera, and we create a AVCaptureDeviceInput to add to the AVCaptureSession. This step is necessary to start capturing something from an input, but we need to specify at least an output if we want to have our callback methods be called eventually.
As we want to support both barcodes and the ability to take screenshots we need two outputs, one will give us metadata, the other an image.
Let’s start with the barcode. As I said AVFoundation will do the work for us and recognise barcodes and QR codes, and it does that via the AVCaptureMetadataOutput class. We can specify which barcodes we’re interested to scan, I configured all the ones available but in if you’re interested in QR codes only you can set only that meta type and you won’t receive other barcodes, even if you point the camera to one of them.
Next we need to set a AVCaptureVideoDataOutput to capture screenshots. The delegate method will be call multiple times with a CMSampleBuffer object, but only after the user asks for a screenshot we actually process the data to create and return a UIImage object from the sample.
To start the scanner we need some more configuration.
public func startScanning() {
    let authorizationStatus = AVCaptureDevice.authorizationStatus(for: .video)
    if authorizationStatus == .notDetermined {
        AVCaptureDevice.requestAccess(for: .video,
                                      completionHandler: { (granted:Bool) -> Void in
                                      self.requestAccessCallback();
        })
        return
    }
    else if authorizationStatus == .restricted || authorizationStatus == .denied {
        print("You don't have permission to access the camera")
        return
    }
    guard let cameraView = self.cameraView,
          let _ = cameraView.superview else {
            print("You need to set camera view")
        return
    }
    guard let session = configureCaptureSession() else {
        print("Cannot configure capture session")
        return
    }
    self.session = session
    previewLayer = AVCaptureVideoPreviewLayer(session: session)
    previewLayer!.frame = cameraView.layer.bounds
    previewLayer!.videoGravity = .resizeAspectFill
    cameraView.layer.addSublayer(previewLayer!)
    queue.async {
        session.startRunning()
    }
Before even creating the session we need to get user authorisation to access the camera.
Then we can configure the AVCaptureSession and finally we create the preview layer to add to our view. The view controller will take care or resizing the view, but in this class we need to respond to user rotating his phone as we want the video coming from the camera to have the correct rotation. This is done in resizeCameraView
func resizeCameraView() {
    guard let previewLayer = previewLayer else {return}
    previewLayer.frame = cameraView!.layer.bounds

    switch UIApplication.shared.statusBarOrientation {
    case .portrait:
        previewLayer.connection?.videoOrientation = .portrait
        break
    case .portraitUpsideDown:
        previewLayer.connection?.videoOrientation = .portraitUpsideDown
        break
    case .landscapeLeft:
        previewLayer.connection?.videoOrientation = .landscapeLeft
        break
    case .landscapeRight:
        previewLayer.connection?.videoOrientation = .landscapeRight
        break
    default:
        break
    }
}
Unfortunately the videoOrientation property isn’t of type UIInterfaceOrientation so we need the switch to set the correct value, boring but necessary.
Now that everything is configured we can start scanning for barcodes, and get them via the delegate method implemented in the view controller.
public func metadataOutput(_ output: AVCaptureMetadataOutput, didOutput metadataObjects: [AVMetadataObject], from connection: AVCaptureConnection) {
    if let codes = self.scanner?.getBarcodeStringFromCapturedObjects(metadataObjects: metadataObjects) {
        print(codes)
        self.completion?(codes, nil)
    }
}

public func getBarcodeStringFromCapturedObjects(metadataObjects:[AVMetadataObject]) -> [String] {
    var codes:[String] = []
    for metadata in metadataObjects {
        if let object = metadata as? AVMetadataMachineReadableCodeObject,
            let stringValue = object.stringValue {
            codes.append(stringValue)
        }
    }
    return codes
}
The delegate method returns an array of AVMetadataObject. In the above snippet I put functions from the view controller and GFBarcodeScanner, so you can see what we need to do in order to convert an AVMetadataObject to a string.At the moment I’m only interested in the stringValue, but the AVMetadataObject has a bounds property of type CGRect, representing the bounding rectangle of the object. We could use this property to draw a rectangle on screen to show the user the objects we’re recognising, I chose not to do it in my first release but it is something possible.
All right, we saw how to scan for barcodes by configuring the AVCaptureSession and get AVMetadataObject from it. What is left is the screenshot, we’re pointing the camera around and would like to capture an image of what we’re currently seeing. We already set up the AVCaptureVideoDataOutput so let’s see how to get data and convert it to a UIImage
public func captureOutput(_ output: AVCaptureOutput, didOutput sampleBuffer: CMSampleBuffer, from connection: AVCaptureConnection) {
    guard let getImageCallback = self.getImageCallback else {return}
    let image = self.scanner?.getImageFromSampleBuffer(sampleBuffer, orientation: currentOrientation)
    getImageCallback(image)
    self.getImageCallback = nil
}

public func getImageFromSampleBuffer(_ sampleBuffer:CMSampleBuffer, orientation:UIInterfaceOrientation) -> UIImage? {
    guard let imageBuffer = CMSampleBufferGetImageBuffer(sampleBuffer) else {return nil}
    var cImage = CIImage(cvImageBuffer: imageBuffer)
    cImage = getOrientedImage(cImage, forOrientation: orientation)
    return UIImage(ciImage: cImage)
}
As I did for the metadata objects I put in the snippet both the delegate call and the utility function to deal with the result.
As we added AVCaptureVideoDataOutput to our session the delegate methods is called as we move the camera around, but only when getImageCallback is set we actually need to process the sample and return the UIImage. A possible optimisation could be adding the AVCaptureVideoDataOutput to the session only after the screenshot button is pressed, so we’d miss a few frames but don’t get called every time we don’t need a screenshot.
As you can see before returning the image I call getOrientedImage, in order to change the image orientation. That’s because I found out AVCaptureVideoDataOutput returns an image in landscape orientation even if you’re holding the phone in portrait mode. I found two solutions: one is to change the image orientation after you take the sample, the other to change the video orientation of the capture session. I went for the first one and guess what? You can’t use UIInterfaceOrientation so you need another switch, this time to provide ExifOrientation.
Next steps
How could I improve my scanner? I already thought of some features to add
- ability to turn on the flash
- deal with pinch to zoom
- switch between wide and telephoto lens
- add support for drawing rectangles on screen
The latest GitHub version of the repository has both the flash and the support for drawing rectangles, but it’s still work in progress. The rectangles are ok most of the time, but if I tilt the phone they are drawn in the wrong spot, so to improve the feature I’ll have to use CoreMotion to take into account device orientation and the gyro and I’ll be able to make adjustments to the rectangles position on screen. I’ll update this article to describe the use of CoreMotion and how to draw rectangles over the camera view.
If you read the entire article thanks for your patience and I hope you’ve found it interesting. If you’re just using my CocoaPod it’s fine, I’m happy to contribute to some other developers work. I always find great stuff on CocoaPods and on Stackoverflow so it is my pleasure to be able to give something to the community 🙂
Happy coding!