One of the topics I wanted to explore about SwiftUI was how to integrate CoreData in it, and I want to describe two approaches you can follow: a direct one using property wrappers and another one by having a class hide the existence of Core Data to the user.
I usually prefer the latter, as it provides an abstraction on top of Core Data, so if I need to change the way I store data in the future my UI code doesn’t have to be modified. Anyway let’s see how to interact with it both ways and you’ll pick the one that fits your needs the most.
The use case
Suppose we have an app that shows a list of artists and for each artist their albums. We want to add an album to our list of favourites, and we want it to be persistent so we can’t store it in memory.
To keep things simple we have a JSON for the artists and one for the albums, so we only need to store the information that the user liked a particular album of an artist.
We could store the information directly into the JSON, but suppose this comes from a server, it is better to save locally on the device only the information Artist-Album -> Like instead of adding a property to an album. To do that we can use CoreData, and I’ll show you how. You can find the full example here
Core Data
Quoting from the official documentation, we can use Core Data to save application’s permanent data for offline use, to cache temporary data, and to add undo functionality to your app on a single device.
That’s what we need, we don’t have a server to store our favourites so we need to do it locally, and we could use Core Data even to cache the JSON itself.
The great thing about Core Data is that you can create the model inside Xcode and you can have a beautiful graph view of it. You don’t have to worry about how data is saved and retrieved, you don’t need to perform SQL queries or operations like add and delete, all you have to do is deal with NSPredicate to retrieve the elements but it is really straightforward. Another advantage is the integration with CloudKit if you want your model to be synchronised to iCloud, but that’s another topic. For now let’s see how to create a simple model to store our favourites.
When you create the new project make sure to check Core Data and Xcode will generate some code for you in AppDelegate as well as create a xcdatamodeld file. This is the model you can interact with in Xcode
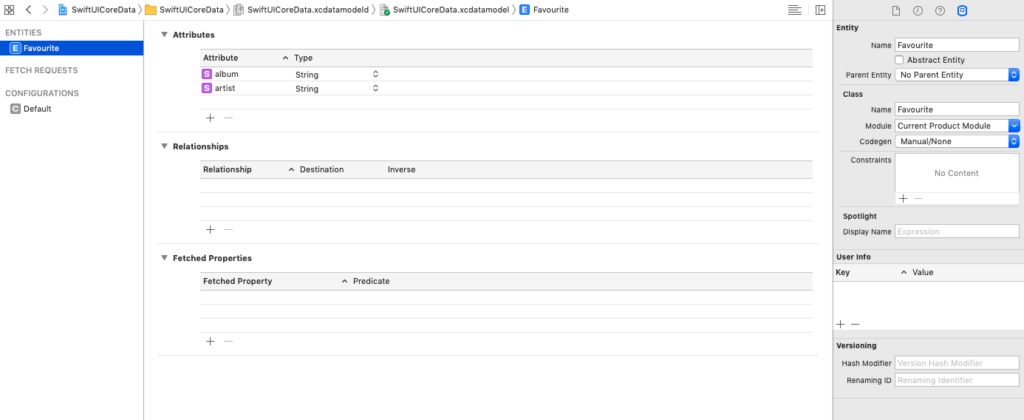
As you can see I created a Favourite entity with two attributes: album and artist. I turned off automatic code generation, as you can see on the right for Codegen set to Manual/None. If you leave the default Xcode will create a Favourite class for you, but it isn’t something you can edit, just extend. You can specify the class name, so you could in theory have another name for your entity. If you provide a custom class make sure to select Current Product Module, otherwise the app will compile but you’ll get an error when trying to work with Core Data on that entity.
Using an abstraction
The first approach I’m showing you is the abstraction via a class I called DataSource, see the code here
As I said to keep things simple I decided to use Core Data only to store the favourites, so part of the class is responsible for loading the JSONs with Albums and Artists and there is no need to describe that functionality here.
The abstraction provides 3 functions: addAlbumToFavourites, isAlbumFavourite and removeAlbumFromFavourites. Those are just wrappers for the private functions dealing directly with Core Data, let’s see all of them.
private var managedContext:NSManagedObjectContext?

// this is in init()
if let appDelegate = UIApplication.shared.delegate as? AppDelegate {
    managedContext = appDelegate.persistentContainer.viewContext
}

private func addRecordToFavourites(album:String, artist:String) {
    guard let context = managedContext else {return}
    if let record = fetchRecord(album:album, artist:artist) {
        print("record \(record) already exists")
        return
    }

    let entity = NSEntityDescription.entity(forEntityName: "Favourite",
                                            in: context)!
    let favourite = NSManagedObject(entity:entity, insertInto:context)
    favourite.setValue(album, forKeyPath:"album")
    favourite.setValue(artist, forKeyPath:"artist")

    do {
      try context.save()
    }
    catch let error as NSError {
      print("Could not save. \(error), \(error.userInfo)")
    }
    self.changed = true
}
To add an album to our favourites we need to add a new record to Favourite, with album and artist. To interact with Core Data we need a NSManagedObjectContext, and as you can see we can get it from our AppDelegate. I mentioned before that checking Core Data instructs Xcode to create some boilerplate code for us, if you see AppDelegate there is a lazy var creating a NSPersistentContainer, and we get the context from it.
We’ll get to the fetchRecord in a minute, I use it to check if a record for the same album exists, if not we can add it.
The record can be created by using NSManagedObject, as you can see we first referred to a Core Data entity with the name Favourite then we create the NSMangedObject and we can set values on it to create the attributes album and artist. Next, we can just try to update the model via context.save(), it may fail so we better put it inside a try catch.
The last line, self.changed = true, is necessary as I’m telling SwiftUI that my model (not the Core Data model, the view model) changed so it is time to update the UI.
private func fetchRecord(album:String, artist:String) -> Favourite? {
    guard let context = managedContext else {return nil}

    let request = NSFetchRequest<Favourite>(entityName: "Favourite")
    request.predicate = NSPredicate(format: "album == %@ and artist == %@", album, artist)

    if let users = try? context.fetch(request) {
        if users.count > 0 {
            return users[0]
        }
    }
    return nil
}
How can we tell if an album is favourite? We can check if a record with its artist and album name is contained in Core Data. NSFetchRequest allows us to make a query, we provide the name of the entity and we need to set a predicate to perform a query. In our example we want album == album and artist == artist, as you can see it is quite simple to perform a query via a predicate.
Next we try to fetch the request, and if it doesn’t fail and return at least one element we can return it, and we know the album is a favourite.
private func removeRecordFromFavourites(album:String, artist:String) {
    guard let context = managedContext else {return}
    if let record = fetchRecord(album:album, artist:artist) {
        context.delete(record)
        self.changed = true
    }
}
The code for removing a record is really simple, once we have retrieved the record we can simply call delete on the context passing the record. Once again setting changed to true tells SwiftUI to update our UI, so we can show a different icon next to an album when we tap on it to add or remove it from favourites.
The code for the UI showing the albums can be found here
As I stated before I like this approach using DataSource as an EnvironmentObject as I can hide the existence of Core Data to my SwiftUI views, but let’s see how we can use it directly in the next example
Using Core Data directly
I added a list of favourites in a separate View, so I don’t need to list the albums of an artist and query for every one of them in order to know whether there is a record in Favourite for a particular album. In this view (find the code here) we perform a query and see the data coming directly from Core Data.
class func fetchAllFavourites() -> NSFetchRequest<Favourite> {
    let request = NSFetchRequest<Favourite>(entityName: "Favourite")
    request.sortDescriptors = [NSSortDescriptor(key: "album", ascending: true)]
    return request
}

struct FavouritesView: View {

    @FetchRequest(fetchRequest: DataSource.fetchAllFavourites()) var favourites:FetchedResults<Favourite>

    var body: some View {
        List(self.favourites, id: \.album) { favourite in
            Text(favourite.album)
        }
    }
}
We’re still using a class function of DataSource, but as you can see we don’t need it from the Environment. fetchAllFavourites is a simple wrapper to make a request to CoreData, and we use it with the property wrapper @FetchRequest. By using this property wrapper we can be sure the fetch is performed without the need to call the function from our view, for example in .onAppear. We can be sure our view will always display the updated model, so every time we add or remove an album this view will contain the correct list of favourites.
let managedObjectContext = (UIApplication.shared.delegate as! AppDelegate).persistentContainer.viewContext

if let windowScene = scene as? UIWindowScene {
    let window = UIWindow(windowScene: windowScene)
    window.rootViewController = UIHostingController(rootView: contentView.environmentObject(DataSource())
        .environment(\.managedObjectContext, managedObjectContext))
    self.window = window
    window.makeKeyAndVisible()
}
In order to use this property wrapper it is important to add the context to the environment. We can still get it from the AppDelegate, but instead of retrieving it during the init function of the DataSource we need to pass it to the environment as shown in the code above.