This post is about a couple of project I put on GitHub to implement authentication via biometric (FaceID or TouchID on the iPhone) and to save login information on the KeyChain.
I wanted to have some fun with SwiftUI so I implemented a custom keypad to enter a PIN, with a button to invoke biometric instead of manually inserting the pin.
The first project, called GFAuthentication, is distributed via SPM. It is based on an old implementation available on CocoaPods here but I plan to maintain only the SPM version from now on.
The SwiftUI project that uses the package and implements the keypad can be found here.
Access the Keychain
As you know, you can store items securely in the Keychain in iOS. It is a great place to store a password for example, so you can be sure the security of your user account cannot be compromised.
I made a Swift wrapper for accessing the keychain, the class GFKeychainWrapper found here.
My wrapper is quite simple and tailored for the job that I had in mind: allowing me to store an account (username and password) and to retrieve the password associated to an account, so I can retrieve a password and save the user the need to enter it every single time.
There are multiple possible values you can store in the Keychain, for my example I chose kSecClassGenericPassword. In order to access the keychain for this kind of item, you need to configure a service. It can be your app’s name, or a string of your choice. This is important because you need it to make a query in the keychain, and retrieve values.
private static func makeKeychainQuery(withService service: String, accessGroup: String? = nil, account: String? = nil) -> [String : AnyObject] {
    var query = [String : AnyObject]()
    query[kSecClass as String] = kSecClassGenericPassword
    query[kSecAttrService as String] = service as AnyObject?

    if let account = account {
        query[kSecAttrAccount as String] = account as AnyObject?
    }

    if let accessGroup = accessGroup {
        query[kSecAttrAccessGroup as String] = accessGroup as AnyObject?
    }

    return query
It is also possible to specify an access group, this is necessary if you want multiple apps to share some values in the keychain. In our example we don’t use it, but it is worth mentioning.
You can add an account to the query, and that’s what I do in the example. I want to store an account and its password.
The actual query is performed with a code that isn’t really “Swifty”
var query = GFKeychainWrapper.makeKeychainQuery(withService: service, accessGroup: accessGroup, account:account)
query[kSecMatchLimit as String] = kSecMatchLimitOne
query[kSecReturnAttributes as String] = kCFBooleanTrue
query[kSecReturnData as String] = kCFBooleanTrue

var queryResult: AnyObject?
let status = withUnsafeMutablePointer(to: &queryResult) {
        SecItemCopyMatching(query as CFDictionary, UnsafeMutablePointer($0))
}

        guard status != errSecItemNotFound else {
            return []
        }
If you’re not familiar with the syntax that’s ok. withUnsafeMutablePointer is necessary to call an Objective-C API within a closure with an in/out parameter. In this example, queryResult is the second parameter of SecItemCopyMatching and in C you’d call this function with &queryResult, as the parameter is passed by reference, not by value.
Looks weird if you’re not familiar with C and Objective-C, but that’s why the wrapper is there, you won’t see any of this code by using the abstraction provided by my package.
Adding an item to the Keychain requires a similar API
private func setNewItem(account:String, password:String) -> Bool {
    let passwordData = password.data(using: String.Encoding.utf8)!
    var newItem = GFKeychainWrapper.makeKeychainQuery(withService: self.service, accessGroup: self.accessGroup, account: account)
    newItem[kSecValueData as String] = passwordData as AnyObject

    let status = SecItemAdd(newItem as CFDictionary, nil)
    guard status == noErr else {
        return false
    }
    return true
}
this time, the query is used with the function SecItemAdd to add the keychain query object with the username and password to the keychain.
Biometric authentication
Storing the password securely in the Keychain is a good move, but you may want to give your users a more convenient way to login than typing their password each and every time they open your app.
First, let’s see how to check if some form of biometric authentication is available. It should be unless you target very old devices, but let’s check it
static func isBiometricAuthenticationAvailable() -> (available:Bool, type: GFLocalAuthenticationBiometricType) {
    let context = LAContext()
    var error: NSError?
    if context.canEvaluatePolicy(.deviceOwnerAuthentication, error: &error) {
        if #available(iOS 11.0, *) {
            if context.biometryType == .faceID {
                return (true, .biometricTypeFaceID)
            }
            else {
                return (true, .biometricTypeTouchID)
            }
        } else { // we can only have TouchID on iOS < 11
            return (true, .biometricTypeTouchID)
        }
    }
    else {
        return (false, .biometricTypeNone)
    }
}
In order to use LAContext remember to import LocalAuthentication. The context is an object that handles user authentication either via biometric (TouchID/FaceID) or the device passcode. If you target iOS versions prior to 11 remember to use the #available statement as faceID wasn’t available back then.
To use FaceID in your app remember to set NSFaceIDUsageDescription in your Info.plist file, otherwise the app won’t work, just like when you forget to set similar values for accessing the Camera or Photo library.
This is how we can attempt to perform a biometric authentication
func attempBiometricAuthentication(options:[String:Any], callback:@escaping ((GFBiometricAuthStatus) -> Void)) {
    let context = LAContext()
    var error: NSError?
    var policy = LAPolicy.deviceOwnerAuthentication
    let revert = options["revertToPasscode"] as! Bool
    if revert == false {
        policy = .deviceOwnerAuthenticationWithBiometrics
    }
    if context.canEvaluatePolicy(policy, error: &error) {
        var reason = defaultReason
        if let r = options["reason"] as? String {
            reason = r
        }
        context.evaluatePolicy(policy, localizedReason: reason) { (success, error) in
            if (success) {
                callback(.biometricSuccess)
            }
            else {
                callback(.biometricFailed)
            }
        }
    }
    else {
        // cannot use biometric
        callback(.biometricNotAvailable)
    }
}
as you saw previously, we need a LAContext to deal with authentication. This time, we need to specify a policy and we use deviceOwnerAuthentication. By doing so, in iOS we can use biometric or the passcode, and on macOS we can use TouchID if present or a nearby Apple Watch. If passcode isn’t enable, the call will fail, as there isn’t a form of authentication to check.
If we don’t want to fall back to the passcode and only use biometrics, we can set deviceOwnerAuthenticationWithBiometrics.
Even if we enable passcode, biometrics will have the priority and the passcode will be asked only if TouchID or FaceID fail.
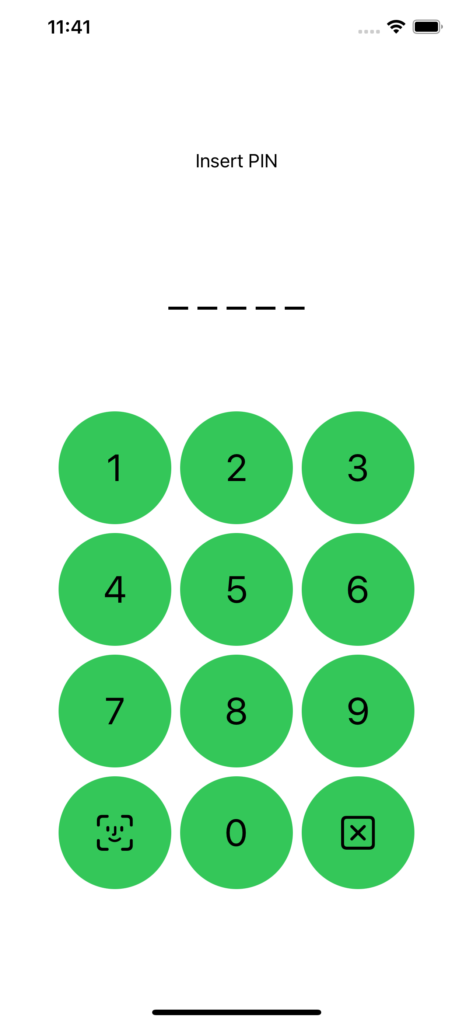
Numeric keyboard in SwiftUI
As a bonus, let’s build a SwiftUI view to enter a pin. The view of course contains numbers from 0 to 9 and has a dedicated button to use biometric instead of inserting the pin. There is also a button to clear the pin inserted so far.
The project can be found here.
Let’s build the keyboard first
struct NumericKeyboard: View {
    @ObservedObject var viewModel: NumericKeyboardViewModel

    var body: some View {
        VStack {
            Text(viewModel.message)
            HStack {
                pinViewFromArray(viewModel.pin, length:viewModel.pinLength)
            }
            .padding(80)
            buttonsRows
        }
    }

// other stuff

private func pinViewFromArray(_ pinArray:[Int], length:Int) -> some View {
    func numberAtIndex(_ index: Int) -> String {
        if pinArray.count >= index + 1 {
            return "*"
        }
        else {
            return "_"
        }
    }

    return ForEach(0..<length) { index in
        Text(numberAtIndex(index))
            .font(Font.largeTitle)
    }
}
We have a VStack with a message, a series of Text with each digit of the pin and the the rows of buttons.
The pin is treated as an array and we want to treat it like a password so we only display a * instead of the actual digit.
This is the keyboard implementation
private var buttonsRows: some View {
    VStack {
        ForEach(0..<3) { externalIndex in
            HStack {
                ForEach(1..<4) { index in
                    buttonForIndex(externalIndex: externalIndex, index: index)
                }
            }
        }
        HStack {
            Button {
                viewModel.loginWithBiometric()
            } label: {
                Image(systemName: "faceid")
            }
            .disabled(!viewModel.enableBiometric)
            .foregroundColor(viewModel.enableBiometric ? Color.primary : Color.gray)
            .buttonStyle(MyButtonStyle())
            buttonForIndex(externalIndex: 0, index: 0)
            Button {
                viewModel.clearPin()
            } label: {
                Image(systemName: "clear")
            }
            .buttonStyle(MyButtonStyle())
        }
    }
For the first 3 rows, I used a nested ForEach to display buttons from 1 to 9. The bottom row has the 0 button and the buttons for biometric and to clear the pin.
As you see, I applied to the buttons a custom style MyButtonStyle, let’s have a look at it
struct MyButtonStyle: ButtonStyle {
    func makeBody(configuration: Configuration) -> some View {
        configuration.label
            .font(Font.largeTitle)
            .frame(width:70, height:70)
            .padding()
            .background(configuration.isPressed ? Color.red : Color.green)
            .clipShape(Circle())
    }

}
Custom button styles can be configured via the protocol ButtonStyle.
The function makeBody returns a View starting from a ButtonStyleConfiguration struct (Configuration is just an alias here).
configuration.label is the view specified by label when you configure the button. We can then apply every sort of customisation to it like changing the font, the foreground and background colours, padding etc.
There is another property of configuration called isPressed that is true when the button is being pressed. By using this property we can change the style of the button while the user is tapping on it, in this example the background become red only while the user is tapping the button and returns green once the tap ends.
struct ButtonNumber: View {
    var number:Int
    var action: () -> Void

    var body: some View {
        Button {
            action()
        } label: {
            Text("\(number)")
        }
        .buttonStyle(MyButtonStyle())
    }
}
this is how we create the numbered buttons from 0 to 9, the view specified in label is a Text displaying the number, and this is exactly the view we found in configuration.label above.
I find it convenient to pass a closure to the button so I can configure the action from the calling view, so the button knows nothing about the app, it just displays a Text with a particular style and call a closure when it is pressed.
That’s it! Hope you enjoyed both the explanation of how to store items in the keychain and my simple keyboard. I always have fun with SwiftUI and I took this occasion to experiment with button styles.
Happy coding 🙂