In this article I’m describing the GitHub project FitnessExample you can find here: https://github.com/gualtierofrigerio/FitnessExample
The main topic is communicating between iOS and watchOS, but I thought I could introduced some HealthKit stuff as well as fitness is a very popular category of watchOS apps.
I’ll update the article as I add functionalities to the project, the first draft consist of an iPhone app where you can create a list of workouts that are sent to the Watch, where you can start and stop a single workout. In the meantime the sensor on the Watch provides heart rate values and at the end of the workout the average rate is sent to the phone.
Introduction
Let’s start with some basic knowledge about watchOS apps.
To distribute one of them you need a companion iOS app, so even if everything happens on the Watch you still need an iOS app.
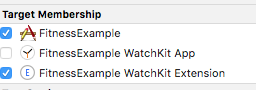
The app is made of three parts:
- iOS app
- WatchKit App
- WatchKit Extension
The iOS app is… well, an iOS app 🙂
Obviously you want to communicate with the app on the Watch, and that’s the main topic I’m covering here, but you could just send local push notifications to the companion watch app and don’t have to deal with sessions and background transfers.
The WatchKit app contains the storyboard and the assets. You don’t put code in there, just the storyboard and all the images you want to embed into the project to use in interface builder.
You need to write code in the Extension, where you put all of your classes to implement the equivalent of UIViewController, called WKInterfaceController.
When you create a Watch app from the template in Xcode you can add notifications, in my sample project I included them although I haven’t used them in my first draft.
Xcode creates 2 or 3 (if you include notifications) schemes for you. You can debug the iOS app or the watchOS app separately, when you run the iOS app in the simulator or on the device the companion watchOS app is reloaded, but if you want to debug the watchOS part you need to run the WatchKit app target, which take a little longer to run on a real device.
I tried to do most of the debug on the simulator as is way faster to load the app every time I need to verify something, but I think it is important to run the app on the Watch as much as possible, as you need to test user interaction and make sure it is fast enough and the UI is easy to deal with.
I’m going to give you the first tip: if you change the bundle name you have to go to every Info.plist and make sure everything is up to date.
The WatchKit app extension Info.plist has a key NSExtension with a child named NSExtensionAttributes. Make sure the property WKAppBundleIdentifier contains the bundle identifier of the WatchKit app, and in the WatchKit app Info.plist check WKCompanionAppBundleIdentifier, it must contain the iOS app bundle identifier. Xcode gives you an error if the names don’t match.
Shared code
Although the apps are part of the same project they don’t necessarily share all the classes. If you want a particular Swift file to be shared between the two you have to add it to both targets.
You don’t need to add a Swift file to the WatchKit App target, as the code for the Watch app resides on the WatchKit Extension.
In this section I’ll cover the 3 classed I decided to share between iOS and watchOS:
- WorkoutManager
- PhoneWatchConnectionHandler
- HealthKitManager
WorkoutManager
Since this is a fitness app let’s start with the basic struct, the Workout struct https://github.com/gualtierofrigerio/FitnessExample/blob/master/Common/Workout.swift
Is a struct containing informations about a workout, like a title, description, optional image, the dates (start, end) and the average heart rate. The struct conforms to Codable, a protocol which combines Encodable and Decodable, really handy if you need to encode/decode your struct to a JSON.
All the workouts are stored in a class called WorkoutManager
https://github.com/gualtierofrigerio/FitnessExample/blob/master/Common/WorkoutManager.swift
Much of this class is boilerplate, like adding an element to the array, replacing an element, delete it. I’m not going into details here.
In the same file you can find the SharedWorkout struct, this is Codable as well and has an array of workouts, a boolean and an index. With this struct I’m able to share a single workout, by setting the isSingle property to true and setting its index, or I can share the entire array of workouts. The struct is used to send data back and forward between the iPhone and the Watch. I added the possibility to share a single workout for the sake of optimisation, so from the Watch you can start/stop a workout and send just it to the iPhone, to save time. At the end of the file you can find the static methods for making the SharedWorkout struct, encoded as JSON. You can see I use everywhere the type PhoneWatchSharedData, it is just a typealias for [String:Any], which is the type of data we can share between iOS and watchOS.
PhoneWatchConnectionHandler
https://github.com/gualtierofrigerio/FitnessExample/blob/master/Common/PhoneWatchConnection.swift
I created a protocol to define the basic functionality of the class.
protocol PhoneWatchConnection {
    func synchronizeData(_ data:PhoneWatchSharedData)
    func getLastData() -> PhoneWatchSharedData
    func getUpdatedData(callback: @escaping(PhoneWatchSharedData) -> Void)
}
You can send data via the synchronizeData function, get the last data sent from the companion device or call getUpdateData to be notified every time new data is received.
I created a class PhoneWatchConnectionHandler to implement this protocol and provide the common functionality. Unfortunately you can’t just use the same implementation on both the Watch and the iPhone, as some delegate methods of WCSession (the class we use to exchange data) are not common to both platforms. That means I had to subclass PhoneWatchConnectionHandler to implement the delegate in each target.
In the first draft I’ve implemented the simplest possible way to communicate between the Watch and the iPhone via the applicationContext. While that’s ok for the purpose of a quick demo and to transfer small amount of data you can’t rely on that method alone to send data back and forth. I also implemented the data transfer to send images from the iPhone to the Watch via the transferFile method of WCSession. If you’re interested in all the way you can communicate between devices I suggest to look at Apple’s own documentation https://developer.apple.com/documentation/watchconnectivity/wcsession?language=objc#1652590
As I mentioned before I created a typealias for [String:Any] as that’s the type of data you can share via the application context.
func synchronizeData(_ data: PhoneWatchSharedData) {
     do {
         try session?.updateApplicationContext(data)
     }
     catch {
        print("error while setting application context")
     }
}

func getLastData() -> PhoneWatchSharedData {
    return session?.applicationContext ?? [:]
}
As you can see you just read the applicationContext variable from WCSession and call updateApplicationContext with a parameter of type [String:Any]. The subclasses are PhoneConnectionHandler and WatchConnectionHandler, I past the WCSessionDelegate of the Watch
extension WatchConnectionHandler :  WCSessionDelegate {
    func session(_ session: WCSession, activationDidCompleteWith activationState: WCSessionActivationState, error: Error?) {
        print("activationDidComplete on Watch")
    }

    func session(_ session: WCSession, didReceiveApplicationContext applicationContext: [String : Any]) {
        print("didReceiveApplicationContext on Watch")
        if let callback = updateCallback {
            callback(applicationContext)
        }
    }

func session(_ session: WCSession, didFinish fileTransfer: WCSessionFileTransfer, error: Error?) {
        print("did finish file transfer")
        transferCompleted(fileTransfer: fileTransfer)
    }
}
We’re notified every time the context is updated via didReceiveApplicationContext, and if there’s a subscriber we call its callback with the updated data. The last method is called when a file has been transferred to the Watch. I keep an array of files to sync and transferCompleted cleans a record on the array.
HealthKitManager
For our example app we can share the same implementation for HealthKitManager as we don’t have functions supported only on one platform. You can find the implementation here https://github.com/gualtierofrigerio/FitnessExample/blob/master/Common/HealthKitManager.swift
I made a shared instance, so this class can be used as a singleton throughout the code. As you can imagine two instances are created, one on the Watch and one on the iPhone as so you can’t share data via a singleton class. The system class we use for dealing with HealthKit is HKHealthStore.
The first thing to do is ask for the necessary authorisations via the requestAuthorization function. We can ask permission to read data and to share it. For example we want to read the heart rate, so that’s a read authorisation, and we want to save workouts, that’s a share authorisation we need to obtain. Our user may grant only read authorisation, or may grant nothing at all. For now let’s suppose we have all the authorisations we asked for.
Since I implemented this class as a singleton I allow multiple observers to register for heart rate notifications, that’s why heartRateObserversCallbacks is an array of HeartRateObserverCallback. Another possible way to implement that would be using delegates, but I usually prefer to have callbacks so I can implement the result as a closure, and I don’t have to deal with multiple protocols for every possibile delegate.
func addHeartRateObserver(callback:@escaping HeartRateObserverCallback) {
    if heartRateObserversCallbacks == nil {
        heartRateObserversCallbacks = [HeartRateObserverCallback]()
        startMonitoringHeartRate()
    }
    heartRateObserversCallbacks?.append(callback)
}
Once the first observer registers itself we start monitoring the heart rate, while if we already have an observer the heart rate is running, so we’ll send updates to one more callback.
There are two ways to get updates for an heart value: using a HKAnchoredObjectQuery with the updateHandler or create a HKObserverQuery and make the specific query inside its update handler. I wanted to experiment with both, but for now in the app I use the anchored query, so it is the one I’ll describe here.
private func getHeartRateAnchoredQuery(fromDate: Date) -> HKAnchoredObjectQuery? {
    guard let heartRateType = heartRateType else {
        print("cannot get heart rate type")
        return nil
    }
    let heartRateQuery = HKAnchoredObjectQuery(type: heartRateType, predicate: nil, anchor: nil, limit: Int(HKObjectQueryNoLimit)) { (query, sampleObjects, deleteObjects, anchor, error) in
        guard let anchor = anchor,
            let sampleObjects = sampleObjects else {
                print("no anchor or sampleObjects returned")
                return
        }
        self.anchor = anchor
        self.notifyHeartRateObservers(forSamples: sampleObjects)
    }
    heartRateQuery.updateHandler = {(query, sampleObjects, deleteObjects, anchor, error) in
        guard let anchor = anchor,
            let sampleObjects = sampleObjects else {
                print("no anchor or sampleObjects returned")
                return
        }
        print("update handler called")
        self.anchor = anchor
        self.notifyHeartRateObservers(forSamples: sampleObjects)
    }
    return heartRateQuery
}
This is the implementation of the HKAnchoredObjectQuery for the heart rate. The variable heartRateType is set to HKQuantityType.quantityType(forIdentifier: .heartRate), I went for a variable so it is more compact and I don’t need to instantiate this quantityType every time. I then create the anchored query with the heart rate time, no limits and no predicate. With the predicate you can specify a start and end date if you want to query for past results, but I’m living that nil. The first call would return an anchor and a sample, but I’m interested in setting the updateHandler so I can get a call every time a new sample is received. To get updates we need to execute the query returned by this function, the HealthStore object does that with the execute method.
Before notifying the observers we need to convert the sample to an int value.
private func getIntValueForSample(_ sample:HKQuantitySample) -> Int {
    return Int(sample.quantity.doubleValue(for:HKUnit.init(from: "count/s"))*60)
    }
we’re interested in knowing the bpm (beats per minute) so we need to convert the value expressed in counts/s and multiply it by 60.
WatchKit app
You can design a Watch app much like an iOS app with storyboard. When you create the app enabling notification Xcode makes 3 interfaces for that, the Static, the Dynamic and the Dynamic Interactive interface. We’ll leave them alone for now and concentrate on the two Interface Controllers I’ve implemented for the app: the list of workouts and the single workout.
The list of workouts uses a WKInterfaceTable. It is the equivalent of a UITableView but the implementation is simpler, as you don’t have to implement a delegate and a data source. While you usually make a subclass of UITableViewController on iOS you don’t have the same concept in watchOS, you subclass WKInterfaceController and call the functions on the WKInterfaceTable object.

As I said all the code is in the WatchKit app extension. The entry point, similar to the AppDelegate in iOS, is a subclass of WKExtensionDelegate
You can find the delegate methods for being notified when the app launches when it becomes active after it run on the background and when is about to be sent to the background.
My only custom implementation here is the creation of the classes I use to manage the connection, WatchConnectionHandler, and the one to store the workout data WorkoutManager. As I use the HealthKitManager as a singleton I don’t need to create a shared instance here.
The first interface is the list of workouts, implemented in WorkoutListInterfaceController https://github.com/gualtierofrigerio/FitnessExample/blob/master/FitnessExample%20WatchKit%20Extension/WorkoutListInterfaceController.swift
All the setup is made in the awake function. I’d say willActivate could be similar to viewDidLoad, but Apple’s documentation advice to perform all the initial setup in awake. There is also a didApper, similar to viewDidAppear in iOS.
override func awake(withContext context: Any?) {
    super.awake(withContext: context)
    if let extensionDelegate = WKExtension.shared().delegate as? ExtensionDelegate {
        workoutManager = extensionDelegate.workoutManager
        connectionHandler = extensionDelegate.connectionHandler
        connectionHandler?.getUpdatedData(callback: { (data) in
            self.getWorkoutsFromData(data)
        })
        getInitialData()
    }
}
as you can see I get the workoutManager and connectionHandler from the ExtensionDelegate, it is some sort of dependency injection in reverse.
I inserted a WKInterfaceTable into this scene, and I can use its outlet to add elements. In this example we only have one row, but it is possible to configure multiple row types for a single table. It is necessary to create a new class for each row type, so you can have IBOutlets of the elements you add in interface builder. I created WorkoutListRow for this purpose and there is only one IBOutlet of type WKInterfaceLabel.
When dealing with multiple row types you need to specify the row type for each index of the table, but as we only have one type we can just set the number of rows via setNumberOfRows
private func refreshTable() {
    workoutTable.setNumberOfRows(workouts.count, withRowType: "WorkoutListRow")
    for index in 0..< workouts.count {
        if let row = workoutTable.rowController(at: index) as? WorkoutListRow {
              row.workoutListLabel.setText(workouts[index].title)
        }
    }
}
the string withRowType is the same I set in interface builder for the row. After setting the number of rows in the table we can refer to each of the rows with rowController(at:) and we can set the text using the IBOutlet we added in the custom class. This interface is very simple and we expect to open a single workout once we tap on its name on the list. In order to do so we can use segues, just like we’d do on the iPhone.

the segue is of kind Push, so the next scene will have the left arrow as a back button. The second option is a Modal segue, similar to the one you have in iOS.
As I implemented a table I can override the contextForSegue function with the rowIndex as a parameter, so I know which row was selected and I can return the same index as a context. I could return the whole workout as the context, but I prefer to have the detail scene to have access to the WorkoutManager so all it needs is the index of the workout and will access to its info via the manager.
Let’s take a look at the single workout scene, implemented in this file
https://github.com/gualtierofrigerio/FitnessExample/blob/master/FitnessExample%20WatchKit%20Extension/WorkoutInterfaceController.swift
We have some IBOutlets for the various labels and the awake function is used to perform all the setup required, including instantiating the HealthKit manager, as we need to get the heart rate in this scene.
override func awake(withContext context: Any?) {
    super.awake(withContext: context)
    guard let extensionDelegate = WKExtension.shared().delegate as? ExtensionDelegate else {return}
    workoutManager = extensionDelegate.workoutManager
    connectionHandler = extensionDelegate.connectionHandler
    if  let ctx = context as? Int,
        let workout = workoutManager?.getWorkout(atIndex: ctx) {
        index = ctx
        currentWorkout = workout
        updateUIWithWorkout(workout)
    }
}
The button title is changed from start to stop based on the value of workoutRunning. In the extension of the class where I put the private functions we can see what happens when the users starts and stops a workout
private func startWorkout() {
    workoutManager?.startWorkout(atIndex:index)
    workoutRunning = true
    heartBeatSamples = [Int]()
    healthKitManager.addHeartRateObserver { (sample) in
        print("read heart sample \(sample)")
        self.heartBeatLabel.setText(String(sample))
        self.heartBeatSamples.append(sample)
    }
}
the call startWorkout to the manager records the start date, then the class adds itself to the observers of the heart rate and gets the updates in the closure. heartBeatSamples is an array containing the samples received from HealthKitManager, we store them here to be able to compute the average value that will be stored in the workout once the stop button is tapped.
private func stopWorkout() {
        let rate = averageHeartRateFromSamples(heartBeatSamples)
        workoutManager?.endWorkout(atIndex:index, averageHeartRate: rate)
        workoutRunning = false
        if let workout = workoutManager?.getWorkout(atIndex: index) {
            let data = WorkoutManager.makeSharableData(forWorkout: workout, atIndex: index)
            connectionHandler?.synchronizeData(data)
        }
    }
when the workout stops we compute the average, tell WorkoutManager to end the workout with that value and synch it back to the iPhone. I chose to do that so, for now, everything is stored on the phone. This is not mandatory, I could persistently store the workouts on the Watch and add a workout session directly from here to HealthKit
The iPhone app
The iPhone app is similar to the Watch counterpart, as it starts with a list of workouts and have a detail view controller for a single workout. There isn’t much interesting to say about the iPhone, since at the moment is a TableView with edit enabled (so you can rearrange items in the list) and a view controller to display a single workout and to edit it.
Send an image from the phone to the watch
A quick description on how I implemented workout images on the app. The image can be set on the iPhone, currently by asking permission to access the photo library to pick an image from there. If the image was show on the iPhone chances are its resolution is quite high, and it would be overkill for the small screen of the Watch. That’s why I don’t send the original image to the Watch, but a smaller version of it.
func sendImageToWatch(_ image:UIImage, withName name:String) {
    guard let session = session else {return}
    if let smallImage = ImageManager.resizeImageForWatch(image) {
        let smallImagePath = pathForWatchImage(withName: name)
        ImageManager.saveImage(smallImage, toPath: smallImagePath, withFormat: ImageFormat.JPEG)
        let fileURL = URL(fileURLWithPath: smallImagePath)
        let fileSession = session.transferFile(fileURL, metadata: nil)
        let syncRecord = SyncListRecord(url:fileURL, session:fileSession)
        syncList.append(syncRecord)
    }
}
The image is resized for the Watch in a static function implemented in ImageManager, then is saved as a JPEG and transferred to the Watch via transferFile. I’m keeping an array of files so synchronise, and clean each entry after the delegate method of WCSession notify about the data transfer.
On the Watch I needed to implement the delegate method didReceiveFile of WCSession
func session(_ session: WCSession, didReceive file: WCSessionFile) {
    let fileName = file.fileURL.lastPathComponent
    let destinationPath = self.imagesFolder + "/" + fileName
    let destinationURL = URL(fileURLWithPath: destinationPath)
    let manager = FileManager()
    do {
        try manager.copyItem(at: file.fileURL, to: destinationURL)
    }
    catch {
        print("error while copying file from \(file.fileURL) to (destinationURL)")
    }
}
file.fileURL contains a temporary path for the received file. If you need to keep the file you ought to copy it to another place before the function ends.
Now that the file is in place I can show it in the InterfaceController.
Next steps
I’m implementing the sendMessage function of WCSession to ask for workouts when the Watch starts. I’ll update the article after I’ll have completed the refactoring.