Swift Package Manager is a tool for helping distributing Swift code and has been around since Swift 3, but with Xcode 11 Apple finally integrated it into the IDE we all use to make iOS apps so it is easier than ever to adopt SPM.
In this article I’ll talk about how to integrate packages distributed via SPM and how to use local packages, something I do in my projects to divide my apps into separate modules and reuse components.
I published a package called PromiseThen that I’ll use as an example, you can find it on GitHub.
A Swift package
A package is a set of Swift files described by a manifest, called Package.swift. You can see an example here.
// swift-tools-version:5.1
// The swift-tools-version declares the minimum version of Swift required to build this package.
import PackageDescription

let package = Package(
    name: "PromiseThen",
    products: [
        // Products define the executables and libraries produced by a package, and make them visible to other packages.
        .library(
            name: "PromiseThen",
            targets: ["PromiseThen"]),
    ],
    dependencies: [
        // Dependencies declare other packages that this package depends on.
        // .package(url: /* package url */, from: "1.0.0"),
    ],
    targets: [
        // Targets are the basic building blocks of a package. A target can define a module or a test suite.
        // Targets can depend on other targets in this package, and on products in packages which this package depends on.
        .target(
            name: "PromiseThen",
            dependencies: []),
        .testTarget(
            name: "PromiseThenTests",
            dependencies: ["PromiseThen"]),
    ]
)
As you can see Package.swift consists in one instruction that creates a new instance of class Package.
A Package has a name and defines products, dependencies and targets.
A product can be a library, as in our example, or an executable.
The dependencies array defines other modules required by the package. You can put other Packages here, local or remote.
Targets are a set of files that define a module or a test suite.

In our example we have a target, that is the main module, and a testTarget consisting of a file used for testing.
Create a new package
Creating a new package is really simple in Xcode 11.
Just go to File -> New -> Swift Package…
Xcode will ask you where to put the package and will create a structure similar to the one we’re using in our example.
You can add file just like you do with other Xcode projects by doing a right click on PromiseThen under sources.
If you’re not planning to use GitHub or other online repositories you can ask Xcode to create a Git repository for you when you create the package.
Add a Swift package
How do we import a Swift package? Xcode made is simple for us, all we need is to open our project, go to the File menu and select Swift Packages. As you can see you can add a package dependency and there are more commands like update the packages or resolve the package versions.
Let’s add a new package first, we can use PromiseThen.
Go to File->Swift Packages->Add package dependency
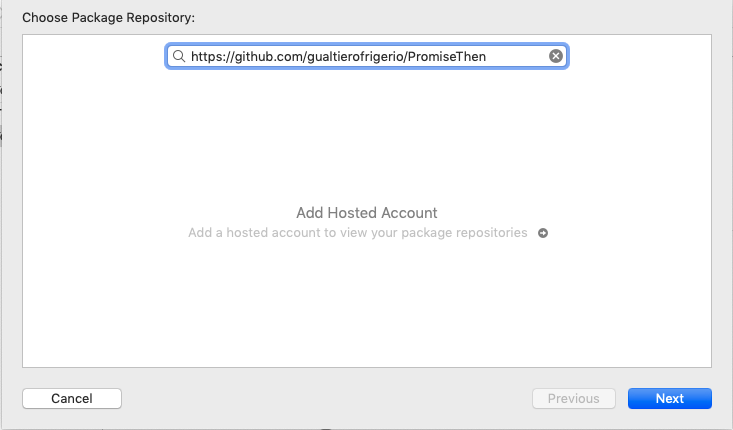
Type the GitHub url of the package and press Next. You can either add the base path, like in my example, or put the .git file.
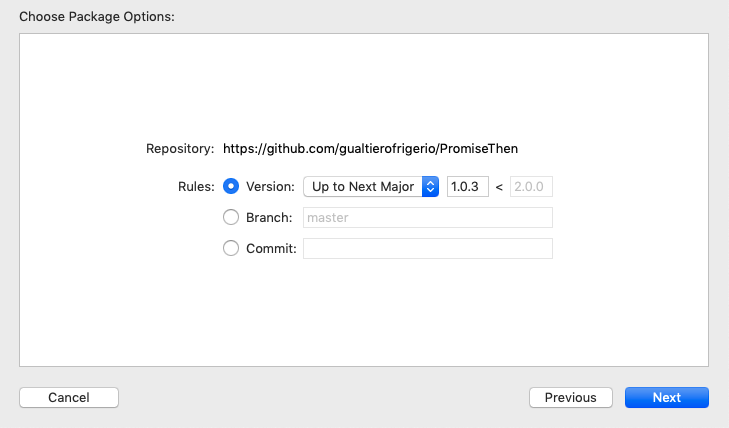
Xcode will fetch the repository and look for tags. The latest tag is 1.0.3 so Xcode selects if for us. We can chose Up to Next Major, means that Xcode will get the latest version up to 2.0.0 or you can select Up To Next Minor, so 1.0.x but not 1.1.x. You can manually specify a range or you can chose Exact and Xcode will only get the version number you specify here. You can also specify a particular branch, or a single commit if you like.
Usually it is a good idea to target Up to Next Major, as a new major release could break compatibility.
Once you added the package you can use it in your code by importing the module, in our example if you want to use PromiseThen you have to import PromiseThen in each Swift file where you want to access it.
If you want to change one of this settings, or remove a package you can go to the Swift Packages section of your Project settings
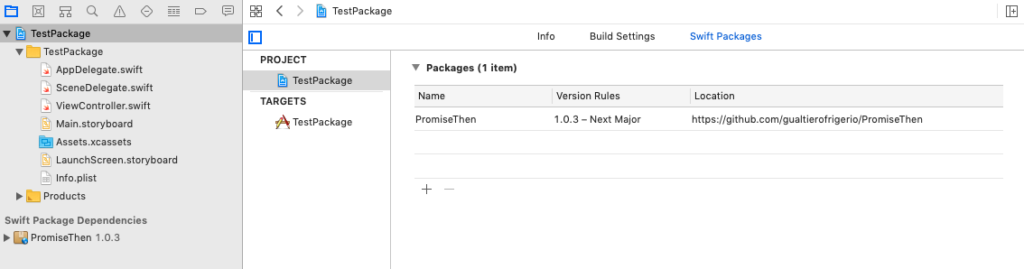
You can double click on a package to open the dialog we saw before, you can delete a package or add a new one from here instead of using the File menu.
If there is a dependency inside the package you imported Xcode will to fetch it for you, and you can always go to the File menu and update to the latest version. Xcode will respect your settings, so you’ll get up to the next Major or the next Minor, or the range you manually set.
Add a local package
You can add a local package the same way you add one hosted on GitHub. Just place the local path when asked for the package URL

If the directory is under version control Xcode will prompt you with the same window asking which version to fetch.
Dependencies
Suppose you’re making a new Swift package and you need to use PromiseThen in your code. It is important to set PromiseThen as a dependency, so when someone will add your package it will automatically get PromiseThen.
Let’s take a look at Package.swift
let package = Package(
    name: "MyPackage",
    products: [

        .library(
            name: "MyPackage",
            targets: ["MyPackage"]),
    ],
    dependencies: [
        .package(url: "https://github.com/gualtierofrigerio/PromiseThen", from: "1.0.0"),
        .package(path: "../pathOfLocalPackage"),
        .package(url: "https://github.com/gualtierofrigerio/PromiseThen", .branch("nameOfTheBranch")),
        .package(url: "https://github.com/gualtierofrigerio/PromiseThen", .exact("1.0.1")),
        .package(url: "https://github.com/gualtierofrigerio/PromiseThen", .upToNextMajor(from: "1.0.3"))
    ],
    targets: [
        .target(
            name: "MyPackage",
            dependencies: []),
        .testTarget(
            name: "MyPackageTests",
            dependencies: ["MyPackage"]),
    ]
)
As you can see we added PromiseThen url to the dependencies array in a few different ways (you can chose one of those). You can define it with an URL and a version (first .package in the example) or have more control by calling .package(url:String, requirement:Package.Dependency.Requirement). You can use exact, branch, revision, upToNextMajor and upToNextMinor, the same options Xcode gives you when adding a package.
You can even add a local package, the second .package into the array in the example.
If you’re interested you can find the source code of PackageDescription here, in particular this is Requirement
Conclusion
That’s it, I think you’ll agree that importing a package is quite simple, so it is creating a new one.
I do like dividing my projects in multiple modules, and importing them as a package is really convenient with Xcode 11.
What I like about separate modules is the ability to develop and test a module, publish it on my local repository and version it.
If you share code between your projects chances are you’ll need to make changes to a module for a particular project and SPM helps you by targeting a specific branch or a version, so you can easily maintain compatibility with existing projects while developing new stuff.
For more information you can watch a couple of good sessions from WWDC 19 about SPM: Adopting Swift Packages in Xcode and Creating Swift Packages
Happy coding 🙂