I want to share my experience building and distributing apps with xcodebuild hoping to help some iOS developer struggling with automating build and distribution via command line.
There are two ways to distribute a test version of your app for iOS: TestFlight and Ad Hoc.
The former allows you to submit a build to App Store connect and immediately push it to your internal team, up to 25 members, or ask for a review and have up t0 10,000 tester receive the build via the Test Flight app on their devices.
But what if you don’t want to bother with creating a new app in App Store Connect? Maybe you’re in the early stage of development, or just prototyping an idea of an app, or don’t yet have access to Connect with your account (that shouldn’t be true starting February 2019 as Apple is allowing the same account on the developer portal and Connect).
Ad Hoc distribution is an easy and quick way to send an app to test devices you have register on the developer portal.
I have to say it isn’t straightforward to get the UUID from your test devices if you need to ask them to a client, and that’s the main advantage of using TestFlight.
I usually send this link: http://whatsmyudid.com/ and I eventually get the UUID I’m asking for, but I think you should rely on TestFlight if you are dealing with non tech-savvy people.
Generate the IPA in Xcode
Let’s start with the easy way: generating an IPA in Xcode.
The first step is creating an archive, it is exactly the same one you’d use to submit an app to the store.
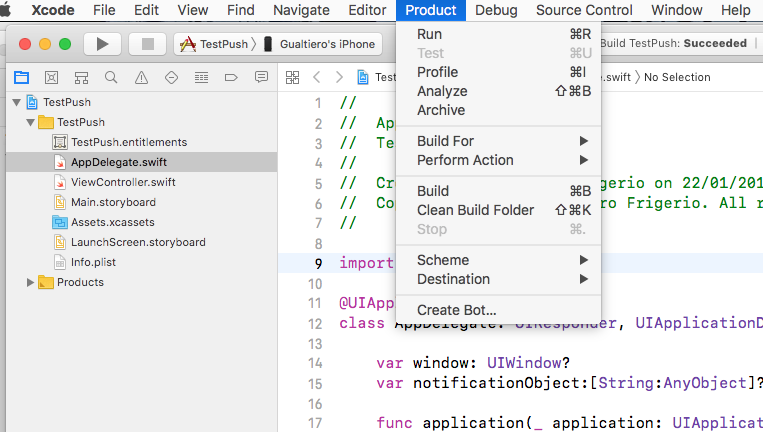
make sure you have a device selected, or Generic iOS device, as your target otherwise Archive will be disabled.
Then open the Organizer (Xcode will likely open it automatically after the archive is ready) and click on Distribute
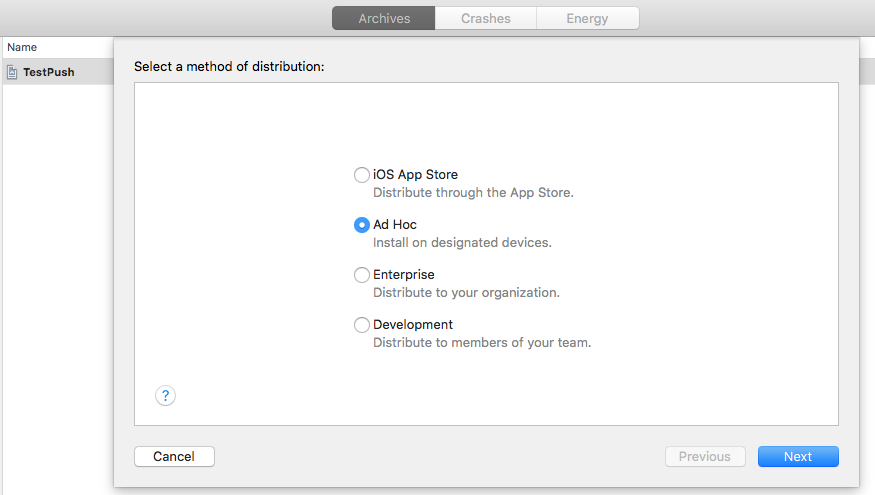
Select Ad Hoc and hit next a couple of times. You can leave Include manifest for over-the-air installation unchecked as I’ll give you the file to use.
You are now prompted for your certificate and iOS Ad Hoc profiles. What you need is a distribution certificate, not a development one, and a provisioning profile linked to that certificate with your registered devices.
Xcode will finally export the IPA into a directory, alongside 3 other files: a log, a plist called DistributionSummary and another useful file named ExportOptions.plist that you’ll need to implement the command line generation of the IPA later on.
Install the IPA over-the-air
Installing the IPA is as simple as tapping on a link on your iOS device that you can send via email or put on a web page.
itms-services://?action=download-manifest&url=https://www.gfrigerio.com/apps/test.plistso the link isn’t the usual http one. iOS recognises itms-services and prompts with an alert asking you to install the app. You do have to provide a valid https url for your manifest, a plist file telling iOS where it the IPA, what is your app’s name, its bundle identifier and the icon file to show during download. Old versions of iOS used to accept http URL, but now you need to have everything in https: the manifest and the URLs contained in it.
<?xml version="1.0" encoding="UTF-8"?>
<!DOCTYPE plist PUBLIC "-//Apple//DTD PLIST 1.0//EN" "http://www.apple.com/DTDs/PropertyList-1.0.dtd">
<plist version="1.0">
<dict>
<key>items</key>
<array>
<dict>
<key>assets</key>
<array>
<dict>
<key>kind</key>
<string>software-package</string>
<key>url</key>
<string>https://www.gfrigerio.com/app/test.ipa</string>
</dict>
<dict>
<key>kind</key>
<string>display-image</string>
<key>needs-shine</key>
<true/>
<key>url</key>
<string>https://www.gfrigerio.com/app/test.png</string>
</dict>
<dict>
<key>kind</key>
<string>full-size-image</string>
<key>needs-shine</key>
<true/>
<key>url</key>
<string>https://www.gfrigerio.com/app/test.png</string>
</dict>
</array>
<key>metadata</key>
<dict>
<key>bundle-identifier</key>
<string>com.gfrigerio.test</string>
<key>bundle-version</key>
<string>1.0</string>
<key>kind</key>
<string>software</string>
<key>title</key>
<string>Test</string>
<key>subtitle</key>
<string>Test</string>
</dict>
</dict>
</array>
</dict>
</plist>
You need to change those fields:
- software-package: url of your IPA
- display-image: url of your app’s icon
- full-size-image: can be the same url of the display image
- bundle-identifier: must be the same bundle identifier of the app
- title: title of the app, should be the bundle display name
- subtitle: it doesn’t really matter what you write here
Remember to have https for all the URLs included in the plist.
Generate the IPA via command line
The same IPA you can build in Xcode via the Archive voice of the menu can be built via a script. You could have a script building the latest version of your app at the end of each day, but even if you launch it manually it saves time to script the building and deploying for over-the-air instead of waiting for Xcode to archive your project, than export it and copy the IPA wherever the URL on the plist points to.
Two steps are necessary to build and distribuite via command line: first you have to archive the app with xcodebuild, then create the package signed with the distribution provisioning profile.
I always start the process by cleaning the old build
xcodebuild cleanTime to archive the project
xcodebuild -scheme TestScheme -sdk iphoneos -archivePath . archive The scheme parameter is the name of one of your schemes, you can see it in Xcode between the start and stop button and the name of the device or simulator. Use iphoneos as SDK as you’re not exporting for a simulator but for a real device. You can specify a path for your archive, while the last command archive defines the operation you want xcodebuild to perform: archive
Finally we can build the IPA from the archive generated in the previous step by calling xcodebuild with parameter -exportArchive
xcodebuild -exportArchive -archivePath TestScheme.xarchive -exportOptionsPlist exportOptions.plist -exportPath . The archive command generated a file called TestScheme.archive, the archivePath parameter specifies a path, in the example you see the file name as I told xcodebuild to create the archive in the current directory.
In order to create an IPA xcodebuild needs a plist containing some information. If you exported the IPA in Xcode you found that very plist in the directory together with the IPA. Here is an example:
<?xml version="1.0" encoding="UTF-8"?>
<!DOCTYPE plist PUBLIC "-//Apple//DTD PLIST 1.0//EN" "http://www.apple.com/DTDs/PropertyList-1.0.dtd">
<plist version="1.0">
<dict>
<key>method</key>
<string>ad-hoc</string>
<key>teamID</key>
<string>ABCDE123</string>
<key>compileBitcode</key>
<false/>
<key>provisioningProfiles</key>
<dict>
    <key>com.gfrigerio.test</key>
    <string>Ad Hoc Distribution</string>
</dict>
</dict>
</plist>
In teamID you have to put your teamID, you can find it in the developer portal if you look at the Prefix value in your application App ID.
Under provisioning profile you need to specify your app’s bundle identifier as the key, and the value is the name of your distribution provisioning profile.
Tips
I want to end this article by giving a couple of tips, as I wasted a lot of time over some of those problems and it isn’t easy to find answers on Stackoverflow or discussions.apple.com
If you get the alert saying there was an error while installing your app it is likely you made a mistake in the plist or the device isn’t in the provisioning profile you’re using.
- check if every URL you’re using is https
- did you put the correct bundle identifier into the plist?
- is your device registered and included into the provisioning profile you used to sign the IPA?
If everything seems ok, the app is installed on the device but crashes right after you launch it (while it works if you run it from Xcode), chances are there is something wrong with the signing process.
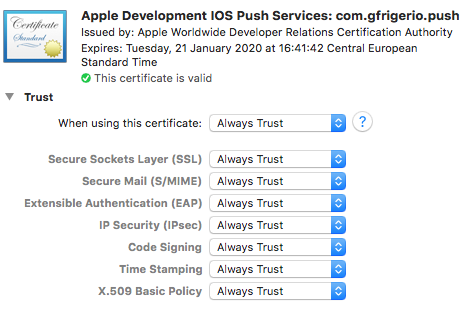
I run into that very problem a while ago and found out it was related to Keychain, where I stored my signing certificate. The Trust option was set to Always trust, xcodebuild signed the IPA without warnings but the app crashed on every device except for the old iPad with iOS 9. I solved by setting Trust to the default, so make sure you have the same value.
Update: Xcode11 gives an error while building the IPA now and tells you to use System defaults.