We all love SwiftUI for its declarative approach and the ability to quickly prototype a UI.
Its simplicity has a few drawbacks though, for example we don’t have full access to the actual view in the hierarchy. One of the problems is taking a screenshot of a particular View.
If we deal with UIKit, getting a screenshot is quite easy, iOS 10 introduced UIGraphicsImageRenderer and before that UIGraphicsBeingImageContext was the way to go, but what about SwiftUI?
There is no built-in function to to accomplish the task, so we’re stuck. If only we had access to a UIView we could take the screenshot from there… well, good news, we can!
As you probably know, you can use SwiftUI and UIKit together in your project, there’s a way to display a UIKit view inside a SwiftUI View and viceversa.
That’s how we’ll get access to a UIKit view, we’ll use UIViewRepresentable to add a UIView inside our SwiftUI View or UIHostingController to do the opposite, then we’ll take the screenshot from it.
I’m going to show you two slightly different ways to capture a screenshot. The first requires less code by using UIHostingController and is easier in my opinion, but may not work in every scenario.
The alternative approach relays on UIViewRepresentable, and at least in my tests is more reliable especially with dynamic content.
As usual, all the code you find here is available on GitHub
UIHostingController
The first approach is the easiest and if it works for you, I guess it is the best to implement.
It involves UIHostingController, a UIKit view controller that can be seen as a container for a SwiftUI View. UIHostingController is necessary when you have a UIKit based app and want to start including SwiftUI into it, once you have your SwiftUI View you can create a UIHostingController by specifying a View as the rootView, and you can then add it as a child view controller, present it or access its UIView and add it as a subview into your UIKit hierarchy.
We can use this particular UIViewController to take a screenshot of a SwiftUI View. I found the code sample below on Hacking with Swift and if you didn’t know about this great resource about Swift development do yourself a favour and check it out, it is full of amazing content!
extension View {
    func snapshot() -> UIImage {
        let controller = UIHostingController(rootView: self)
        let view = controller.view

        let targetSize = controller.view.intrinsicContentSize
        view?.bounds = CGRect(origin: .zero, size: targetSize)
        view?.backgroundColor = .clear

        let renderer = UIGraphicsImageRenderer(size: targetSize)

        return renderer.image { _ in
            view?.drawHierarchy(in: controller.view.bounds, afterScreenUpdates: true)
        }
    }
}
this extension adds a snapshot function to a SwiftUI View. As you can see it embeds the current View into a UIHostingController, then access its view (a UIView) property and use it to render a UIImage via UIGraphicsImageRenderer.
That’s clever, and it usually works.
Take a look at this example, from my GitHub project
struct ToggleView: View {
    @State var darkBackground = false

    var body: some View {
        VStack {
            Toggle(isOn: $darkBackground) {
                Text("Switch to dark")
            }
            .background(darkBackground ? Color.black : Color.white)
            Button {
                snapshot().saveToDocuments()
            } label: {
                Text("Take screenshot ToggleView")
            }
        }
    }
}
the saveToDocuments function is an extension of UIImage that saves it as a PNG in your app’s Document folder, so when you’re testing the screenshot on the simulator you can have a copy of the PNG and open it on your Mac for checking that everything is fine.
As I said, this approach usually works, but there are some scenario where it doesn’t. Let’s see a couple of them, staring with ToggleView. If you take a screenshot with the extension using UIHostingController it always works, you see a black background when the toggle is on and a white one when is off.
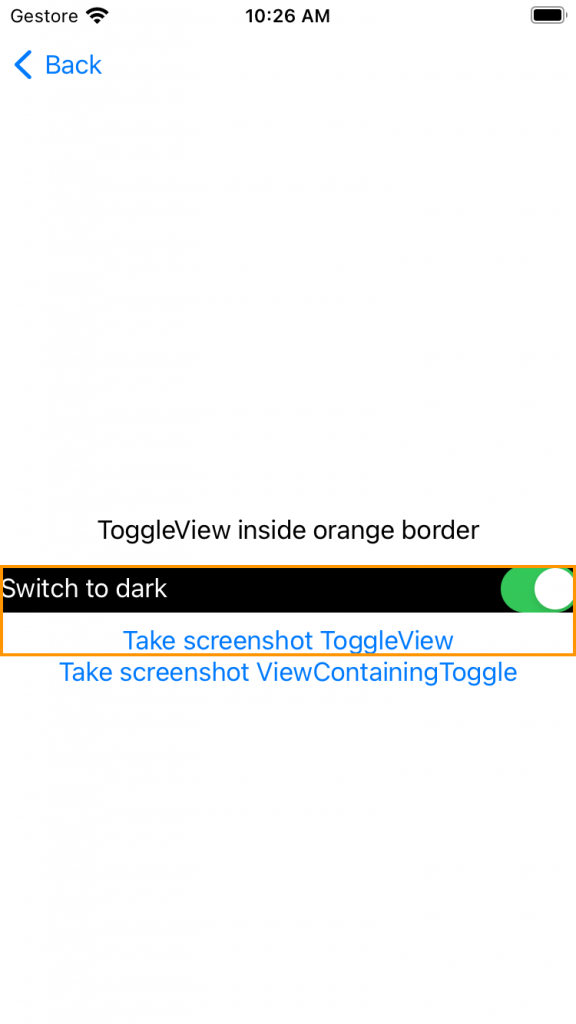
Try embedding ToggleView inside another View though
struct ViewContainingToggle: View {
    var body: some View {
        VStack {
            Text("ToggleView inside orange border")
            ToggleView()
                .border(.orange, width: 2.0)
            Button {
                snapshot().saveToDocuments()
            } label: {
                Text("Take screenshot ViewContainingToggle")
            }
        }
    }
}

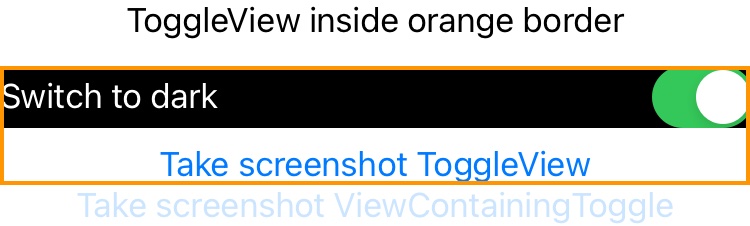
and take a screenshot with the toggle on. The image will always have the toggle switched off, and a white background as you can see in the image above. We took the picture of the right view, but with the wrong value.
What’s going on? SwiftUI is recreating ToggleView, and since darkBaground default value is false, the View is initialised with a white background and the Toggle off.
Let’s see another example with an EnvironmentObject passed to a View down in the hierarchy
struct ViewWithEnvironment: View {
    @EnvironmentObject var sharedModel: SharedModel

    var body: some View {
        VStack {
            Text("Counter = \(sharedModel.counter)")
            Button {
                self.snapshot().saveToDocuments()
            } label: {
                Text("Take screenshot inside ViewWithEnvironment")
            }
        }
    }
}
This time, is even worse. If you take a screenshot inside the view, you can get your nice PNG with the correct value of counter.
But try embedding the view inside another one and take a screenshot from there, you’ll get a Fatal error
SwiftUI/EnvironmentObject.swift:70: Fatal error: No ObservableObject of type SharedModel found. A View.environmentObject(_:) for SharedModel may be missing as an ancestor of this view.
Looks like the EnvironmentObject is missing.
You could solve this problem by passing the environmentObject modifier to the UIHostingController like this:
func snapshot(environment: SharedModel) -> UIImage {
    let controller = UIHostingController(rootView: self.environmentObject(environment))
    let view = controller.view

    let targetSize = controller.view.intrinsicContentSize
    view?.bounds = CGRect(origin: .zero, size: targetSize)
    view?.backgroundColor = .clear

    let renderer = UIGraphicsImageRenderer(size: targetSize)

    return renderer.image { _ in
        view?.drawHierarchy(in: controller.view.bounds, afterScreenUpdates: true)
    }
}
and it would work, no crashes this time. But as you can see, this isn’t a great workaround. What if you have different environment objects? The function should be made as generic as possible, and you’d still have the problem we saw before with Toggle.
Luckily, we can come up with a different implementation that allows us to capture a screenshot of the current view without reloading part of it.
UIViewRepresentable
The second approach, that should solve the problems listed above, involves UIViewRepresentable.
First, let’s understand what it does.
UIViewRepresentable is, quoting from the documentation, a wrapper for a UIKit view that you use to integrate that view into your SwiftUI view hierarchy.
Once your own struct implements this protocol, you’ll be able to add it as a View into your SwiftUI hierarchy.
SwiftUI will then call makeUIView and you’ll return your UIKit view there.
Let’s see an example from one of my projects FeedReader where I needed to display a WKWebView inside a SwiftUI project
struct WebKitView: UIViewRepresentable {
    let url: URL
    let delegate:WKNavigationDelegate

    func makeUIView(context: Context) -> some UIView {
        let webView = WKWebView()
        webView.navigationDelegate = delegate
        webView.load(URLRequest(url: url))
        return webView
    }

    func updateUIView(_ uiView: UIViewType, context: Context) {

    }
}

struct ArticleView: View {
    @ObservedObject var viewModel:ArticleViewModel

    var body: some View {
        if viewModel.showError {
            Text(viewModel.errorMessage)
        }
        ZStack {
            if let url = viewModel.article.url {
                WebKitView(url: url, delegate: viewModel)
            }
            if viewModel.showSpinner {
                ProgressView()
            }
        }
    }
}
I can put WebKitView inside a ZStack, and a WKWebView will be rendered there.
So we have a way to add a UIKit view to our SwiftUI View, and we’re going to use it for the screenshot.
Once we have access to a UIView, we can easily get its parent view, and we can go up in the hierarchy as much as we like.
The idea is adding a UIViewRepresentable to the View we want to take a screenshot of, then access the UIKit view, find the common ancestor and render the UIImage via UIGraphicsImageRenderer.
Let’s start by creating a UIViewRepresentable
typealias ScreenshotMakerClosure = (ScreenshotMaker) -> Void

struct ScreenshotMakerView: UIViewRepresentable {
    let closure: ScreenshotMakerClosure

    init(_ closure: @escaping ScreenshotMakerClosure) {
        self.closure = closure
    }

    func makeUIView(context: Context) -> ScreenshotMaker {
        let view = ScreenshotMaker(frame: CGRect.zero)
        return view
    }

    func updateUIView(_ uiView: ScreenshotMaker, context: Context) {
        DispatchQueue.main.async {
            closure(uiView)
        }
    }
}

class ScreenshotMaker: UIView {
    /// Takes the screenshot of the superview of this superview
    /// - Returns: The UIImage with the screenshot of the view
    func screenshot() -> UIImage? {
        guard let containerView = self.superview?.superview,
              let containerSuperview = containerView.superview else { return nil }
        let renderer = UIGraphicsImageRenderer(bounds: containerView.frame)
        return renderer.image { (context) in
            containerSuperview.layer.render(in: context.cgContext)
        }
    }
}
the struct is initialised with a closure, and this closure has a UIView as a parameter. This is necessary because we need the SwiftUI View to have access to the UIView in order to take the screenshot.
makeUIView creates the UIView ScreenshotMaker, the frame is CGRect.zero as we don’t need to draw anything there, we just need that UIView to access the ancestors.
When updateUIView is called, we can finally call the closure we were given. This is how we pass the UIView to SwiftUI. In order to have a convenient way to instantiate a new ScreenshotMakerView let’s add an extension to View
extension View {
    func screenshotView(_ closure: @escaping ScreenshotMakerClosure) -> some View {
        let screenshotView = ScreenshotMakerView(closure)
        return overlay(screenshotView.allowsHitTesting(false))
    }
}
This function created a new ScreenshotMakerView with the closure, then returns a new View that will be attached to the one calling this function. What overlay does, is placing the new View in front of the one calling it. Note that we need to add allowHitTesting and set to false, otherwise the new view even if is transparent would block the interaction with the original view.
I hope you’ve followed me so far, but I guess an example is the best way to explain what’s going on.
Let’s change one of the previous views that didn’t work with the first approach
struct ViewContainingToggle: View {
    @State var screenshotMaker: ScreenshotMaker?

    var body: some View {
        VStack {
            Text("ToggleView inside orange border")
            ToggleView()
                .border(.orange, width: 2.0)
            Button {
                if let screenshotMaker = screenshotMaker {
                    screenshotMaker.screenshot()?.saveToDocuments()
                }
                else { // first approach implementation with UIHostingController
                    snapshot().saveToDocuments()
                }
            } label: {
                Text("Take screenshot ViewContainingToggle")
            }
        }
        .screenshotView { screenshotMaker in
            self.screenshotMaker = screenshotMaker
        }
    }
}
this is the View that contains ToggleView. As we found out, ToggleView was initialised when we tried to take the screenshot with the snapshot extension.
Now we can add .screenshotView to the View we want to screenshot, then we have the closure returning the ScreenshotMaker, and once we have this object we can save it in a @State var. This is not mandatory, if you like you can take the screenshot inside the closure and it will be taken immediately, without waiting for a Button tap like in the example.
The same approach works for the view with the EnvironmentObject as well.
as you can see this time the screenshot was taken with the dark background. Note that the button is in the pressed state, so you may want to exclude a button from the screenshot or find a way to have it in the right state.
If you still have a minute, I want to explain to you how it works.
Try placing a breakpoint on the function screenshot of ScreenshotMaker.
Let’s see a simple example with only a VStack containing a Text.
po self
<inspectswiftui.screenshotmaker: 0x7f7b3991d620;="" frame="(0" 0;="" 31.5="" 20.5);="" layer="<CALayer:" 0x6000037ba1c0="">>

po containerView
<_TtC7SwiftUIP33_A34643117F00277B93DEBAB70EC0697116_UIInheritedView: 0x7f7b39918f50; frame = (524.5 456; 31.5 20.5); anchorPoint = (0, 0); autoresizesSubviews = NO; userInteractionEnabled = NO; layer = <calayer: 0x6000037bb7a0="">>

po containerSuperview
<_TtGC7SwiftUI14_UIHostingViewGVS_15ModifiedContentVS_7AnyViewVS_24NavigationColumnModifier__: 0x7f7b3991d140; frame = (0 0; 1080 810); gestureRecognizers = <nsarray: 0x600003959530="">; layer = <calayer: 0x6000037ba340="">>

</calayer:></nsarray:></calayer:></inspectswiftui.screenshotmaker:>
self is the UIView ScreenshotMaker, the one we placed on top of the VStack we want to take a screenshot of. Its frame is 31.5 20.5, the size of a simple text of 4 letters.
containerView is the common ancestor of ScreenshotMaker and the VStack, in this case the frame is exactly the one we want to capture as the origin is the right one, in the middle of the screen.
Finally, we have the superview that contains the whole screen except for the navigation bar, in this example is an iPad in landscape mode. We want to be precise, so we only capture the frame of the SwiftUI view were we placed .screenshotView as you have seen in the image.
If you need to capture the whole view, put .screenshotView on the NavigationView.
struct MainView: View {
    @StateObject var sharedModel = SharedModel()

    var body: some View {
        NavigationView {
            VStack {
                Text("Counter = \(sharedModel.counter)")
                Button {
                    sharedModel.counter += 1
                } label: {
                    Text("Increment counter")
                }
                Spacer()
                NavigationLink(destination: ContainerView()) {
                    Text("Show container view")
                }
                Spacer()
                NavigationLink(destination: ToggleView()) {
                    Text("Show view with toggle")
                }
                Spacer()
                NavigationLink(destination: ViewContainingToggle()) {
                    Text("Show view containing ToogleView")
                }
                Spacer()
            }
            .screenshotView { screenshotMaker in
                // take a screenshot only of the VStack without the title
                screenshotMaker.screenshot()?.saveToDocuments()
            }
            .navigationTitle("This is the title")
        }
        .screenshotView { screenshotMaker in
            // take a screenshot of the NavigationView including the title
            screenshotMaker.screenshot()?.saveToDocuments()
        }
        .navigationViewStyle(StackNavigationViewStyle())
        .environmentObject(sharedModel)
    }
}
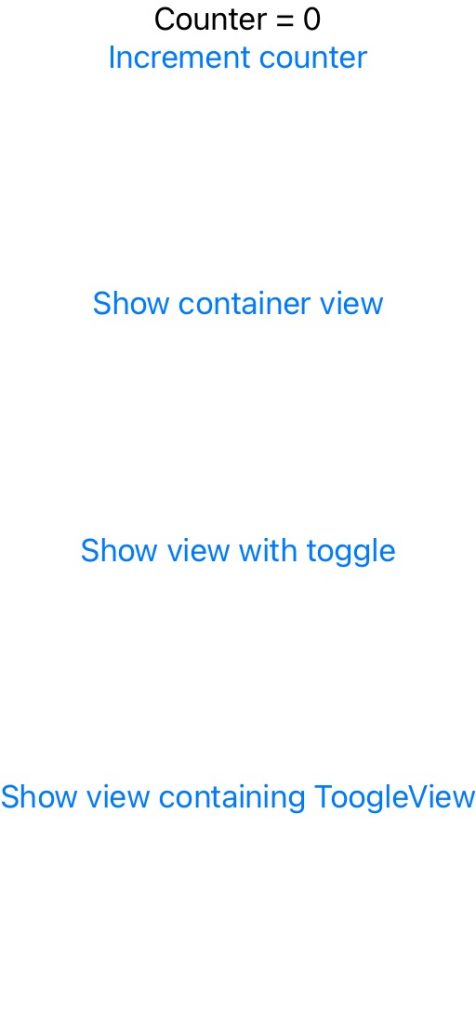
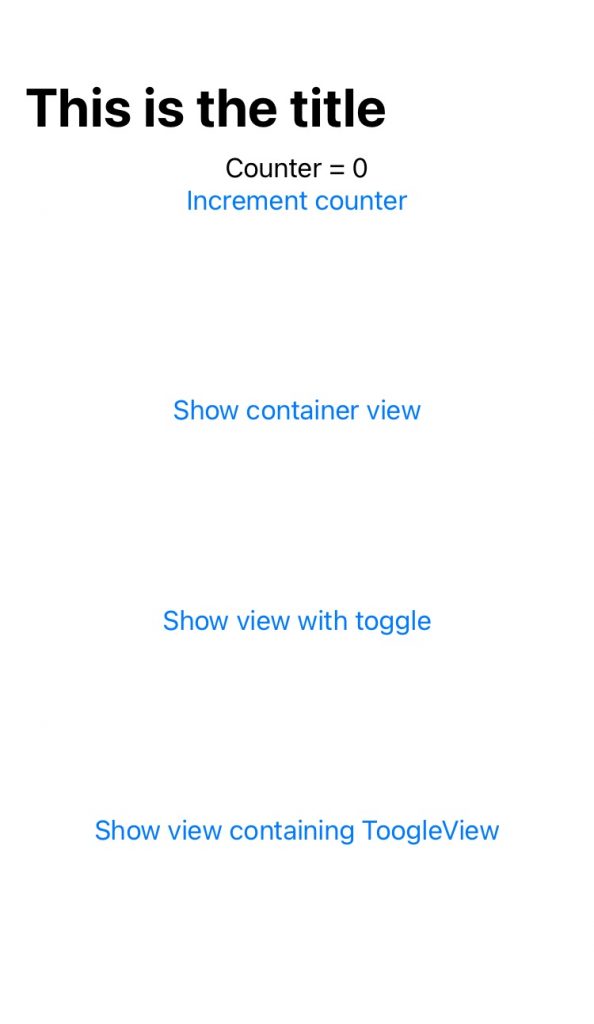
the pictures above show two different screenshots. The one in the left is taken by placing .screenshotView on the VStack, the one on the right with .screenshotView on the NavigationView including the title.
Conclusion
In this article I’ve shown you two ways of capturing a screenshot of a SwiftUI view.
I think it would be great to have some sort of API from Apple to perform such a task, because especially the second approach I described here is not completely safe to use. It works today, it may break in future SwiftUI releases if Apple changes the way UIViewRepresentable is inserted into the hierarchy.
If the example doesn’t work for you please reach out on Twitter or on Github so I’ll be able to tweak it if necessary.
If you want to include the code in your project feel free to copy the struct and classes from the GitHub project I linked above, or you can add the package ScreenshotSwiftUI via SPM.
Happy coding 🙂